
学习完了 babel 的编译流程、AST、api 之后,我们已经可以做一些有趣的事情了。
# 需求描述
我们先做一个简单的功能练练手:
我们经常会打印一些日志来辅助调试,但是有的时候会不知道日志是在哪个地方打印的。希望通过 babel 能够自动在 console.log 等 api 中插入文件名和行列号的参数,方便定位到代码。
# 实现思路分析
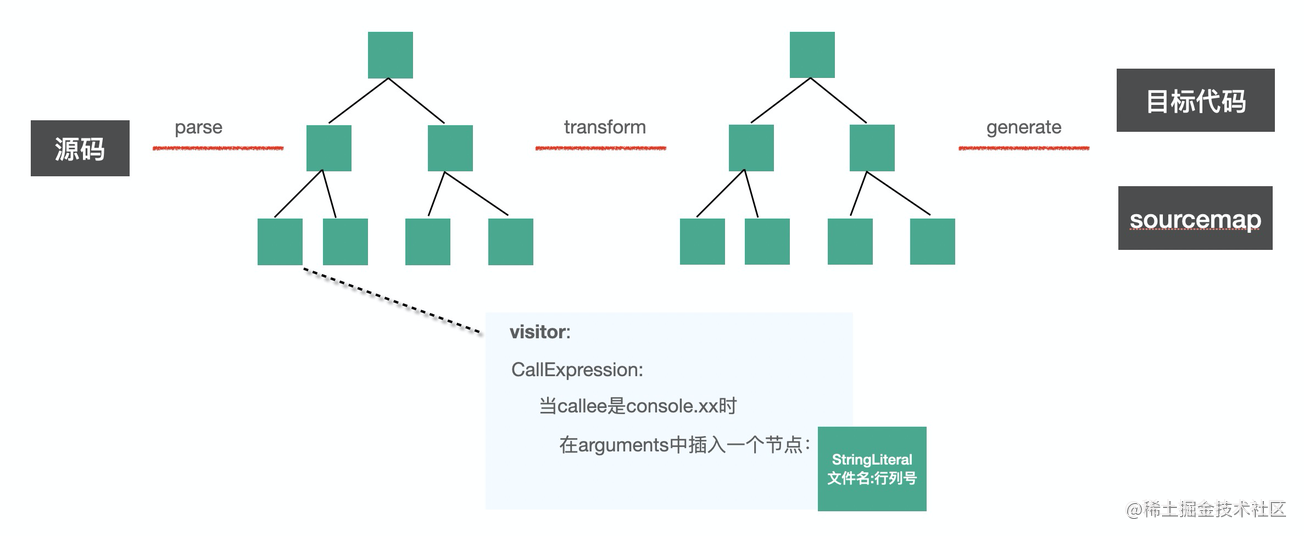
需要做的是在遍历 AST 的时候对 console.log、console.info 等 api 自动插入一些参数,也就是要通过 visitor 指定对函数调用表达式 CallExpression(这个可以通过 astexplorer.net (opens new window) 来查看) 做一些处理。CallExrpession 节点有两个属性,callee 和 arguments,分别对应调用的函数名和参数, 所以我们要判断当 callee 是 console.xx 时,在 arguments 的数组中中插入一个 AST 节点。
# 代码实现
首先把 parse、transform、generate 的框架搭好:
const parser = require('@babel/parser');
const traverse = require('@babel/traverse').default;
const generate = require('@babel/generator').default;

const sourceCode = `console.log(1);`;

const ast = parser.parse(sourceCode, {
  sourceType: 'unambiguous'
});

traverse(ast, {
    CallExpression(path, state) {

    }
});

const { code, map } = generate(ast);
console.log(code);
(因为 @babel/parser 等包都是通过 es module 导出的,所以通过 commonjs 的方式引入有的时候要取 default 属性。)
parser 需要指定代码是不是包含 import、export 等,需要设置 moduleType 为 module 或者 script,我们干脆设置为 unambiguous,让它根据内容是否包含 import、export 来自动设置 moduleType。
搭好框架之后,我们先设计一下要转换的代码:
const sourceCode = `
    console.log(1);

    function func() {
        console.info(2);
    }

    export default class Clazz {
        say() {
            console.debug(3);
        }
        render() {
            return <div>{console.error(4)}</div>
        }
    }
`;
代码没啥具体含义,主要是用于测试功能。
这里用到了 jsx 的语法,所以 parser 要开启 jsx 的 plugin。
我们按照前面分析的思路来写一下代码:
const ast = parser.parse(sourceCode, {
    sourceType: 'unambiguous',
    plugins: ['jsx']
});

traverse(ast, {
    CallExpression (path, state) {
        if ( types.isMemberExpression(path.node.callee)
            && path.node.callee.object.name === 'console'
            && ['log', 'info', 'error', 'debug'].includes(path.node.callee.property.name)
           ) {
            const { line, column } = path.node.loc.start;
            path.node.arguments.unshift(types.stringLiteral(`filename: (${line}, ${column})`))
        }
    }
});
当是 console.xxx 的 AST 时,在参数中插入文件名和行列号,行列号从 AST 的公共属性 loc 上取。
输出的代码符合预期:
console.log("filename: (2, 4)", 1);

function func() {
  console.info("filename: (5, 8)", 2);
}

export default class Clazz {
  say() {
    console.debug("filename: (10, 12)", 3);
  }

  render() {
    return <div>{console.error("filename: (13, 25)", 4)}</div>;
  }

}
现在判断条件比较复杂,要先判断 path.node.callee 的类型,然后一层层取属性来判断,其实我们可以用 generator 模块来简化.
const targetCalleeName = ['log', 'info', 'error', 'debug'].map(item => `console.${item}`);
traverse(ast, {
    CallExpression(path, state) {
        const calleeName = generate(path.node.callee).code;
         if (targetCalleeName.includes(calleeName)) {
            const { line, column } = path.node.loc.start;
            path.node.arguments.unshift(types.stringLiteral(`filename: (${line}, ${column})`))
        }
    }
});
代码瞬间精简了很多,还可以调用 path.get('callee').toString(),一样的效果。
# 需求变更
后来我们觉得在同一行打印会影响原本的参数的展示,所以想改为在 console.xx 节点之前打印的方式
# 思路分析
这个需求的改动只是从参数中插入变成了在当前 console.xx 的AST之前插入一个 console.log 的 AST,整体流程还是一样。创建这种较复杂的 AST,我们可以使用 @babel/template包。
这里有两个注意的点:
- JSX 中的 console 代码不能简单的在前面插入一个节点,而要把整体替换成一个数组表达式,因为 JSX 中只支持写单个表达式。
也就是
<div>{console.log(111)}</div>
要替换成数组的形式
<div>{[console.log('filename.js(11,22)'), console.log(111)]}</div>
- 用新的节点替换了旧的节点之后,babel traverse 会继续遍历新节点,这是没必要的,所以要跳过新生成的节点的处理。
# 代码实现
插入 AST 可以使用 path.insertBefore 的 api, 而替换整体节点用 path.replaceWith, 判断是 insertBefore 还是 replaceWith 要看当前节点是否在 JSXElement 之下,所以要用path.findParent 方法顺着 path 查找是否有 JSXElement 节点。replace 的新节点要调用 path.skip 跳过后续遍历。
if (path.findParent(path => path.isJSXElement())) {
    path.replaceWith(types.arrayExpression([newNode, path.node]))
    path.skip();// 跳过子节点处理
} else {
    path.insertBefore(newNode);
}
要跳过新的节点的处理,就需要在节点上加一个标记,如果有这个标记的就跳过。
整体代码如下
const targetCalleeName = ['log', 'info', 'error', 'debug'].map(item => `console.${item}`);
traverse(ast, {
    CallExpression(path, state) {
        if (path.node.isNew) {
            return;
        }
        const calleeName = generate(path.node.callee).code;
         if (targetCalleeName.includes(calleeName)) {
            const { line, column } = path.node.loc.start;
            const newNode = template.expression(`console.log("filename: (${line}, ${column})")`)();
            newNode.isNew = true;

            if (path.findParent(path => path.isJSXElement())) {
                path.replaceWith(types.arrayExpression([newNode, path.node]))
                path.skip();
            } else {
                path.insertBefore(newNode);
            }
        }
    }
});
# 改造成babel插件
上面完成的功能想要复用就得封装成插件的形式,babel 支持 transform 插件,形式是函数返回一个对象,对象有 visitor 属性。
module.exports = function(api, options) {
  return {
    visitor: {
      Identifier(path, state) {},
    },
  };
}
第一个参数可以拿到 types、template 等常用包的 api,不需要单独引入这些包。
作为插件用的时候,并不需要自己调用 parse、traverse、generate,只需要提供一个 visitor 函数,在这个函数内完成转换功能。
state 中可以拿到用户配置信息 options 和 file 信息,filename 就可以通过 state.filename 来取。
上面的代码很容易可以改造成插件:
const targetCalleeName = ['log', 'info', 'error', 'debug'].map(item => `console.${item}`);
module.exports = function({types, template}) {
    return {
        visitor: {
            CallExpression(path, state) {
                if (path.node.isNew) {
                    return;
                }
                const calleeName = generate(path.node.callee).code;
                 if (targetCalleeName.includes(calleeName)) {
                    const { line, column } = path.node.loc.start;
                    const newNode = template.expression(`console.log("${state.filename || 'unkown filename'}: (${line}, ${column})")`)();
                    newNode.isNew = true;

                    if (path.findParent(path => path.isJSXElement())) {
                        path.replaceWith(types.arrayExpression([newNode, path.node]))
                        path.skip();
                    } else {
                        path.insertBefore(newNode);
                    }
                }
            }
        }
    }
}
然后通过 @babel/core 的 transformSync 方法来调用
const { transformFileSync } = require('@babel/core');
const insertParametersPlugin = require('./plugin/parameters-insert-plugin');
const path = require('path');

const { code } = transformFileSync(path.join(__dirname, './sourceCode.js'), {
    plugins: [insertParametersPlugin],
    parserOpts: {
        sourceType: 'unambiguous',
        plugins: ['jsx']
    }
});

console.log(code);
这样我们成功就把前面调用 parse、traverse、generate 的代码改造成了 babel 插件的形式,只需要提供一个转换函数,traverse 的过程中会自动调用。
# 总结
这一节我们通过一个在 console.xxx 中插入参数的实战案例练习了下 babel 的 api。
首先通过 @babel/parser、@babel/traverse、@babel/generator 来组织编译流程,通过@babel/types 创建AST,通过 path 的各种 api 对 AST 进行操作。
后来需求改为在前面插入 console.xxx 的方式,我们引入了 @babel/template 包,通过 path.replaceWith 和 path.insertBefore 来操作 AST,需要通过 path.findParent 来判断 AST 的父元素是否包含 JSXElement 类型的 AST。子节点的 AST 要用 path.skip 跳过遍历,而且要对新的 AST 做标记,跳过对新生成的节点的处理。
之后我们把它改造成了 babel 插件,是一个函数返回一个对象的格式,函数的第一个参数可以拿到各种 babel 常用包的 api,比如 types、template。 插件不需要调用 parse、traverse、generate 等 api,只需要提供 visitor 函数。最后我们通过 @babel/core 的 api 使用了下这个插件。
学完这一节,我们对前 3 节学习的编译流程、AST、api 都做了一些实践,有了更具体的理解。
(代码在这里 (opens new window),建议 git clone 下来通过 node 跑一下)


