
本节主要讲解 H5+ API 扫码接口,移动端的小字与1px像素边框的处理。
# 页面布局
当前页面的布局沿用在上一节中提到的布局。为两部分:头部标题栏 + 滚动浏览区域。头部标题栏 fixed 固定,内容区用 scroll-view 组件撑开整个页面。
相关代码:
<view>
    <!-- 头部 -->
    <uni-nav-bar fixed :status-bar="true">
        头部内容
    </uni-nav-bar>
    <!-- 滚动区域 -->
    <scroll-view scroll-y="true" class="page-content" @scroll="scroll" :scroll-top="scrollTop">
        滚动区域内容
    </scroll-view>
</view>
data() {
    return {
        scrollTop: 0
    };
},
methods: {
    // 滚动到顶部标题变换
    scroll (e) {
        let scrollTop = e.detail.scrollTop
        if (scrollTop < 5) {
            this.title = ''
            this.scrollTop = 0
        } else {
            this.title = '账号'
        }
    },
}
这里有区别于其他开发页面的是,页面标题栏标题当滚动区域滚动到一定位置时隐藏,由 scroll() 处理监听滚动,当滚动位置达到一定位置时,scroll 页面到滚到顶部并清空标题。使用 scrollTop < 5 而不是 scrollTop == 0 的原因是用户操作触发的滚动值未必会精确到 0,这里对值进行了取舍,临近顶部的时候,取值 scrollTop 为 0。如果运动点达到某一个取值的时候,就让这个点达到理想值下。这是很多运动动画操作的一个方法。
# cell组件

对于这种 cell 样式使用 flex 布局可以快速解决左(图标)+ 右(cell内容)的排版。这种存在重复性的页面可以考虑使用组件去复用,在这里我使用了uni-list-item 组件 (opens new window)。
<uni-list>
    <uni-list-item title="口袋彩铃" thumb="/static/image/account/a_16.png" size='mini'/>
    <uni-list-item title="我的订单" thumb="/static/image/account/a_19.png" size='mini' border0/>
    <uni-list-item title="创作者中心" thumb="/static/image/account/a_09.png" size='mini' border0 class="mt16"/>
    <!-- more items -->
</uni-list>
import uniList from '@/components/uni-list/uni-list.vue'
import uniListItem from '@/components/uni-list-item/uni-list-item.vue'
export default {
    components: {
        uniList,
        uniListItem,
    },
    data() {
        return {}
    }
}
对于拿来即用的组件,可能还会与自己实际业务上的设计还有一定差距,这个时候就要自己动手扩展组件属性。根据cell高度需求我在这添加了属性 size='mini' border0,这样 uni-list-item 子组件对着两个属性进行判定 class 名字,样式根据类名进行样式处理:
<!-- uni-list-item.vue -->
<view class="uni-list-item__container" :class="[{'border': border0}, size]">
    <!-- 内容 -->
</view>
props: {
    size: { // 缩略图尺寸
        type: String,
        default: ''
    },
    border0: { // 无边框
        type: Boolean,
        default: false
    },
}
.uni-list-item__container {
    &:before{
        position:absolute;
        content: '';
        right:0;
        bottom:0;
        width:600rpx;
        border-top: 1px solid #e6e6e6;
        transform: scaleY(0.5);
    }
    &.mini{
        padding: 30rpx 30rpx 30rpx 0;
        &:before{
            width:646rpx;
        }
    }
    &.border:before{
        border:0;  // 去掉边框
    }
}
- 通过向 uni-list-item 子组件中传递属性 border0 ,进而控制不显示底部边框的显示隐藏。
- 通过向 uni-list-item 子组件中传递属性 size ,进而控制图片大小以及 cell 高度。
# 扫码功能开发
当前页面有个扫码的功能,我们可以使用 H5+ API 扫码接口,Barcode 模块可使得 Web 开发人员能快速方便调用设备的摄像头进行条码扫描识别,而不需要安装额外的扫描插件。这次只打算在 app 才可使用扫码,因此这一块功能需要条件编译处理一下。
创建扫码识别控件对象:
plus.barcode.create(id, filters, styles)
参数:
- id: ( String ) 必选 扫码识别控件的标识 可用于通过
plus.barcode.getBarcodeById()方法查找已经创建的扫码识别控件对象。 - filters: ( Array[ Number ] ) 可选 条码类型过滤器 条码类型常量数组,默认情况支持QR、EAN13、EAN8类通过此参数可设置扫码识别支持的条码类型(注意:设置支持的条码类型越多,扫描识别速度可能将会降低)。
- styles: ( BarcodeStyles ) 可选 扫码识别控件样式 用于设置扫码控件在页面中显示的样式,如扫码框、扫码条的颜色等。
说明:
此方法创建扫码识别控件并不会显示在页面中,需要调用 plus.webview.Webview 窗口对象的 append 方法将其添加到 Webview 窗口中才能显示。 注意:需要设置styles 参数的 top/left/width/height 属性指定扫码识别控件的位置及大小,否则可能无法正确显示。
栗子:
// 创建一个二维码(plus.barcode.QR)扫码框
var barcode = plus.barcode.create('barcode', [plus.barcode.QR], {
    position: 'fixed',
    top: '64px',
    left: '0px',
    width: '100%',
    height: '100%',
});

// 扫码成功回调
barcode.onmarked = function (type, result) {
    console.log(type, result)
};

// 添加到当前 Webview
plus.webview.currentWebview().append(barcode);

// 打开扫码
barcode.start();
图片示例:
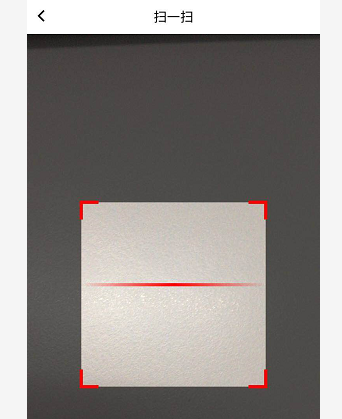
来尝试封装成单独一个组件,有助于管理。
<!-- components/scan/scan.vue -->
<template>
    <view></view>
</template>

<script>
    export default {
        data() {
            return {
                typeList: [ // 码类型 参考地址 https://www.dcloud.io/docs/api/zh_cn/barcode.html
                    plus.barcode.QR,
                    // plus.barcode.EAN13,
                    // plus.barcode.EAN8,
                    // plus.barcode.UPCA,
                    // plus.barcode.UPCE,
                    // plus.barcode.CODABAR,
                    // plus.barcode.CODE39,
                    // plus.barcode.CODE93,
                    // plus.barcode.CODE128,
                    // plus.barcode.ITF,
                ],
            };
        },
        methods: {
            open() {
                // 创建上层webview
                let pages = getCurrentPages();
                let currentWebview = pages[pages.length - 1].$getAppWebview();
                // 创建一个扫码框
                this.barcode = plus.barcode.create('barcode', this.typeList, {
                    position: 'fixed',  // fixed 固定在页面
                    top: '64px',
                    left: '0px',
                    width: '100%',
                    height: '100%',
                });
                // 扫码成功回调
                this.barcode.onmarked = this.onmarked;
                // 添加到当前 Webview
                currentWebview.append(this.barcode);
                // 打开扫码
                this.barcode.start();
            },
            // 关闭扫码
            close () {
                this.barcode.close();
            },
            // 扫码成功
            onmarked (type, result) {
                this.openStartRecognize(result)
                this.$emit('success', result);
                this.close()
            }
        }
    }
</script>
<style lang="scss"></style>
引用:
<!-- pages/account/index.vue -->
<scan ref="scan" @success="getScanCode"/>
// pages/account/index.vue
import scan from '@/components/scan/scan.vue'
export default {
    components: {
        scan
    },
    data () {
        return {}
    },
    methods: {
        // 打开扫描
        openScan () {
            this.$refs.scan.open()
            this.isShowScan = true
            // 隐藏底部 tabbar
            uni.hideTabBar({})
        },
        // 隐藏扫描
        closeScan () {
            this.$refs.scan.close()
            this.isShowScan = false
            uni.showTabBar({})
        },
        // 扫码成功
        getScanCode (val) {
            this.closeScan()
            uni.showToast({
                icon: 'none',
                title: '扫码成功',
            });

            // 业务代码...
        }
    }
}
需要注意的是,底部导航栏会遮盖扫码识别控件,因此打开扫码的时候隐藏底部导航栏,使用 Uniapp 的 API 操作导航栏 uni.hideTabBar({})。
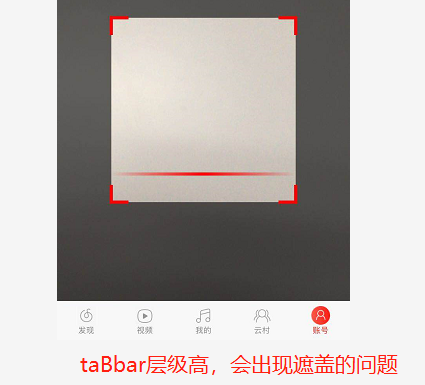
设置扫码识别控件在扫码时可以开启摄像头的闪光灯 obj.setFlash(true);
想要小程序也支持扫码功能,可以使用 uni.scanCode (opens new window)。
更多 H5+ 的 api 功能可以参考HTML5+ API Reference (opens new window)。
# 1px边框 和 10px字体
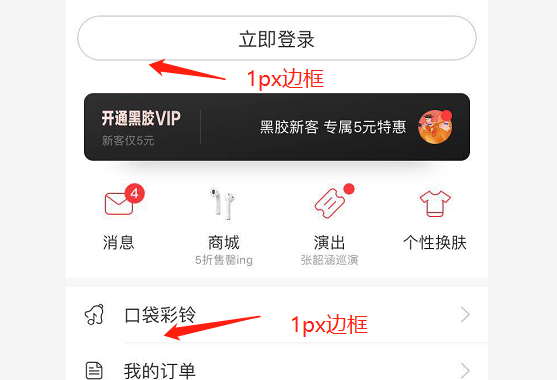
按钮边框与cell边框
看上图中两个边框都是 1px,但是看起来粗细有些不一样,为什么呢?告诉你,是我们的屏幕的问题。
我们的移动端设备(手机,ipad等)都是 Retina 显示屏。Retina 显示屏一种具备超高像素密度的液晶屏,同样大小的屏幕上显示的像素点由1个变为多个,所以在高清显示屏中的位图被放大,图片会变得模糊,因此移动端的视觉稿通常会设计为传统 PC 的2倍。因此你拿到的设计稿是 750px,而不是 375px。而且在 Retina 屏中,像素比为 2(iPhone6/7/8) 或 3(iPhone6Plus/7Plus/8Plus) 的手机中,1px 的边框看起来比真的 1px 更宽。
我们使用的是 rpx 伸缩性单位,如果你在设计稿中测量的边框为 1,在项目中设置边框为:
.border1{
    border-top: 1rpx solid #ddd;
}
实际编译后:
.border1{
    border-top: 0.5px solid #ddd;
}
这个时候你就要小心了!! 苹果机 ios8+ 的可以识别浮点类型的单位,因此苹果机可以渲染这个 0.5px,可以看到所谓的一像素细小边框。然而,绝大部分的 android 机是不支持浮点类型单位的(边框失效)。
关于一像素边框的处理,我习惯 伪类 + transform 的方法。即利用 :before 或者 :after 实现 border ,并 transform 的 scale Y轴缩小一半,将 border 绝对定位。
元素本身不定义边框,伪元素定义 1px 边框:
<!-- 底部边框 -->
.border-bottom1 {
    position: relative;
    &:after{
        position:absolute;
        content: '';
        right:0;
        bottom:0;
        width:600rpx;
        border-top: 1px solid #e6e6e6;
        transform: scaleY(0.5);
    }
}
这样可以完美兼容到多种设备上了,那文字很小的怎么办呢?
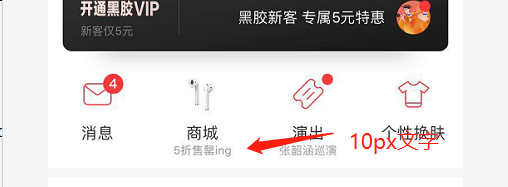
Chrome 为了更好显示中文规定了默认最小字体是 12px,很多手机厂商及浏览器也有这样的规定。那么上图中 10px 字体就会在某些设备下失效。有没有解决方法呢? 其实答案就在上面,对文字使用 transform 的 scale 进行缩小。
.font10px{
    font-size: 24rpx;
    transform: scale(0.84);
}
这样我们就可以看到小字了,但这只是缩小了文字的大小,并不能将文字所占的区域大小缩小,即无法缩小元素的 width 和 height。防止区域大小缩小后影响到其他元素的排版,可以只对包含文字的元素再包括一层行内元素,只对行内元素缩小。
<view class="name">
    <text class="font10px">10px</text>
</view>
# 小结
- 拿来即用的组件并不完全适用自己的项目,可以根据组件要求进行二次改造;
- 小字与1px边框的问题,可以使用 css3 的 transform 进行缩放;
- 对于设备模块,可以当做插件来看待,根据代码运行平台不同按需引用即可。
- 本章代码 uni-course-实战开发帐号页 (opens new window)。


