
本节主要讲解分包机制,其他次级页面的开发。
# 小程序分包机制
每次打开小程序会发现有的小程序打开的很快,有些很慢,甚至白屏时间很长。原因是包代码量大小的问题。第一次进入小程序的时候,小程序会下载主包代码,如果我们的主包业务代码越多,那么白屏的时间也会越长。
小程序有个机制是在小程序启动时,默认会下载主包并启动主包内页面,当用户进入分包内某个页面时,客户端会把对应分包下载下来,下载完成后再进行展示。因此我们不能把所有代码都放在主页面里面。我们把次级页面放到分包里面。
在构建小程序分包项目时,通常会创建一个或多个分包。每个使用分包小程序必定含有一个主包。所谓的主包,即放置默认启动页面 TabBar 页面,以及一些所有分包都需用到公共资源(css,js,image);而分包则是根据开发者的配置进行划分。
某些情况下,开发者需要将小程序划分成不同的子包,在构建时打包成不同的分包,用户在使用时按需进行加载。在 pages.json 我们需要 subPackages 管理次级页面的路由:
// pages.json
"pages": [],
"subPackages": [
	{
		"root": "pages/subpages/index",   // 分包根目录
		"pages": [{
			"path": "album",              // 配置页面路径
			"style": {
				"navigationBarTitleText": "歌单",
				"app-plus": {
					"titleNView": false
				}
			}
		}]
	}
],
分包里面的 pages 与主包的 pages 页面组成保持一致。对小程序进行分包,可以优化小程序首次启动的下载时间,以及在多团队共同开发时可以更好的解耦协作。
因此像歌单这样的次级页面都会在分包中注册管理。
# 页面跳转与获取参数
关于页面跳转,在我们常识中就是浏览器对象窗口 location(url)属性的改变,可能我们第一印象是 a 标签,或者 location 对象的 href 属性进行页面的跳转。可是在 Uniapp 框架中怎么实现跳转呢?比如我要从首页跳转到歌单页?
在 Uniapp 中想要实现跳转,可以查看路由与页面跳转 (opens new window),由 uni.navigateTo, uni.redirectTo, uni.navigateBack, uni.switchTab, uni.reLaunch 五个 api 组成,比如从首页跳转到列表页:
// 跳转到歌单页面并传递参数 1
uni.navigateTo({
	url: '/pages/subpages/index/album?id=1',
	success: function () {  // 成功时回调函数
		console.log('跳转成功')
	}
})
在 Uniapp 中也有类似的 a 标签元素 navigator。
由于 Uniapp 中并没有 a 标签以及 location 对象,页面跳转则要使用框架中的 api 来进行对象跳转。
像平常的页面跳转,我们使用页面标签即可,要是在事件回调中则使用 api 进行跳转,比如在首页的场景中的推荐歌单跳转歌单页面,附带传参数 id,可以在生命周期回调函数 onLoad 的参数值中获取到。
navigator 默认点击时的样式是有虚影状态的,我们需要设置 hover-class="none" ,设置成点击没有态效果。默认跳转方式 open-type="navigate"。
在 /pages/index/index.vue 首页
<!-- index.vue -->
<!-- 歌单分类块 -->
<view class="song-list">
	<view class="tit-bar">
		推荐歌单
		<view class="more fr">歌单广场</view>
	</view>
	<scroll-view class="scroll-view" scroll-x>
		<navigator class="item" v-for="(item, index) in recommendSongs" :key="index" hover-class="none" :url="'/pages/subpages/index/album?id='+ item.id">
			<image class="img" :src="item.picUrl + $imgSuffix"></image>
			<view class="desc ellipsis">{{ item.name }}</view>
			<view class="count">{{ item.playCount }}</view>
		</navigator>
	</scroll-view>
</view>
在歌单页
//  /pages/subpages/index/album.vue
<script>
	export default {
		data() {
			return {}
		},
		onLoad(options) {  //options为object类型,会序列化上个页面传递的参数
			console.log(options.id); //打印出上个页面传递的参数。
			this.getData(options.id);
		},
		methods: {
			// 获取歌单
			getData(id) {
				var par = {
					id
				};
				apiAlbumDetail(par).then(res => {
					res.playlist.description = res.playlist.description.slice(0, 27)
					this.album = res.playlist;
					this.playList = res.privileges;
				});
			},
		}
	}
</script>
以上实现了页面与页面之间的传值,这样的传值相对简单,在处理复杂传值情况下,遇到 url 有长度限制,太长的字符串会传递失败,可使用窗体通信、全局变量,或 encodeURIComponent 等多种方式解决,如下为 encodeURIComponent 示例。
<navigator :url="'/pages/navigate/navigate?item='+ encodeURIComponent(JSON.stringify(item))"></navigator>

// navigate.vue页面接受参数
onLoad: function (option) {
	// 参数解码
	const item = JSON.parse(decodeURIComponent(option.item));
}
# 设置背景模糊图像

这一块要使用 CSS3 filter(radius) 属性给图像设置高斯模糊。"radius"一值设定高斯函数的标准差,或者是屏幕上以多少像素融在一起, 所以值越大越模糊;
.bg {
	position: absolute;
	top: 0;
	left: 0;
	height: 100%;
	width: 100%;
	filter: blur(35px);    // 模糊程度
	background-position: 0 0px;
	background-repeat: no-repeat;
	background-size: cover;
	overflow: hidden;
}
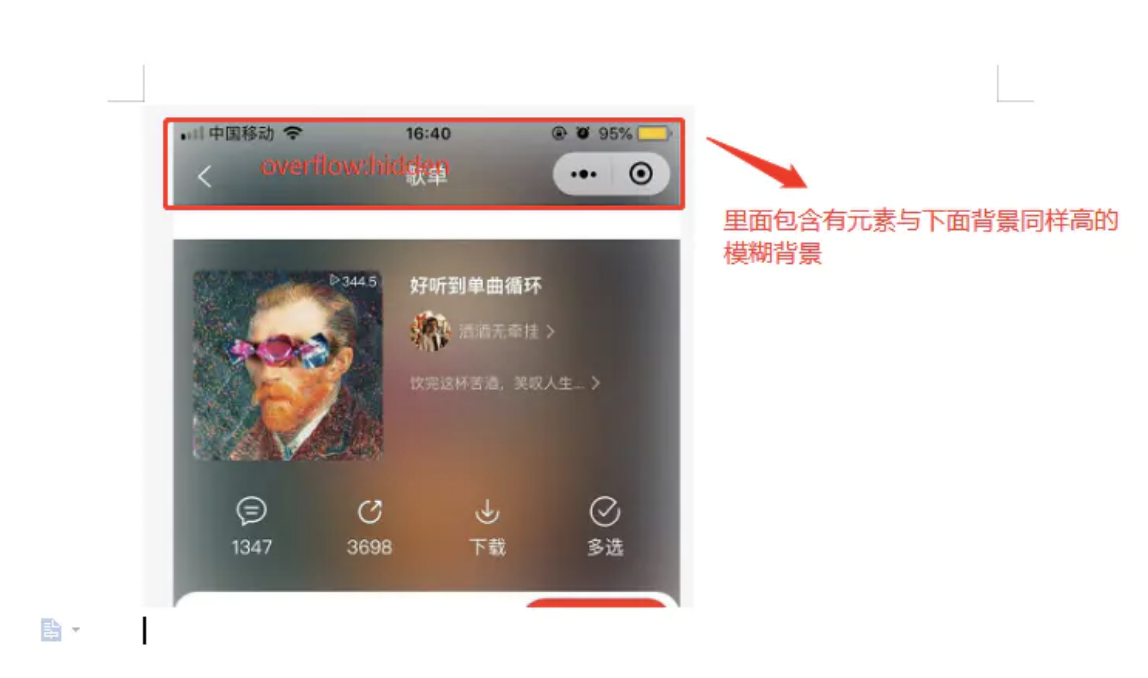
<!-- 标题栏 -->
<view class="nav-bar">
	<view class="h300">
		<view class="bg" :style="'background-image:url('+ (album.backgroundCoverUrl || (album.coverImgUrl + $imgSuffix)) +');top: ' + scrollTop + 'px'"></view>
	</view>
	<view class="nav-bar-con">
		标题
	</view>
</view>
<!-- 内容 -->
<scroll-view scroll-y="true" class="page-content" @scroll="scrollpage">
	<view class="album-top">
		<view class="bg" :style="'background-image:url(' + (album.backgroundCoverUrl || (album.coverImgUrl + $imgSuffix)) + ')'"></view>
	</view>
</scroll-view>
$bgheight: 688rpx;
$bgtop: -44px;
.bg {   // 滤镜模糊
	position: absolute;
	top: 0;
	left: 0;
	height: 100%;
	width: 100%;
	filter: blur(35px);
	background-position: 0 0px;
	background-repeat: no-repeat;
	background-size: cover;
}
.h300{ // 标题栏模糊背景容器
	position:relative;
	height: $bgheight;
}
.nav-bar-con{  // 标题层级比背景高,不会防止点击返回箭头
	position: absolute;
	z-index: 20;
}

.album-top {  // 内容头部画面
	position: relative;
	top: $bgtop;
	height: $bgheight;
	padding-top:44px;
	overflow: hidden;
	background: #fff;
}

这里的交互比较特殊,就是标题栏的背景一直衔接内容头部画面背景,因此在滑动内容区的时候监听滑动区的滚动高度,然后标题栏的背景相对应滚动同等高度
// 防抖,防止高频率操作
function debounce(fn, wait = 10) {
	var timeout = null;
	return function() {
		if(timeout !== null) clearTimeout(timeout);
		timeout = setTimeout(fn, wait);
	}
}
var that = null
methods: {
	scrollpage (e) {
		this.scrollY = e.detail.scrollTop
		this.scroll()
	},
	// 设置背景条
	scroll: debounce(() => {
		if (that.scrollY < 5) {
			that.scrollTop = 20
		} else {
			if (that.scrollY < 300) {
				that.scrollTop = - parseInt(that.scrollY) + 20
			}
		}
	}),
}
# 小结
- 理解小程序分包机制,优化加载速度,提高用户体验;
- 跳转 tabbar 页面,也就是底部导航指定的页面,必须在 navigator 设置跳转方式
open-type="switchTab"; - 页面之间通过 url 传参,对 url 参数一定的限制。
← 实战8_搜索组件开发 实战10_登录页开发 →


