# 前言
React 是 Facebook 公司开发的用于构建用户界面的 JavaScript 库,React 是现在使用最广泛的组件库,相信大家都比较了解 React 的基本原理及使用,这里不再累赘,下面主要和大家一起学习下 React 新的特性。
翻阅官方文档是最好的学习途径,官方文档地址:
# React 项目地址(附新特性源码)
# React 基础
# React 生命周期
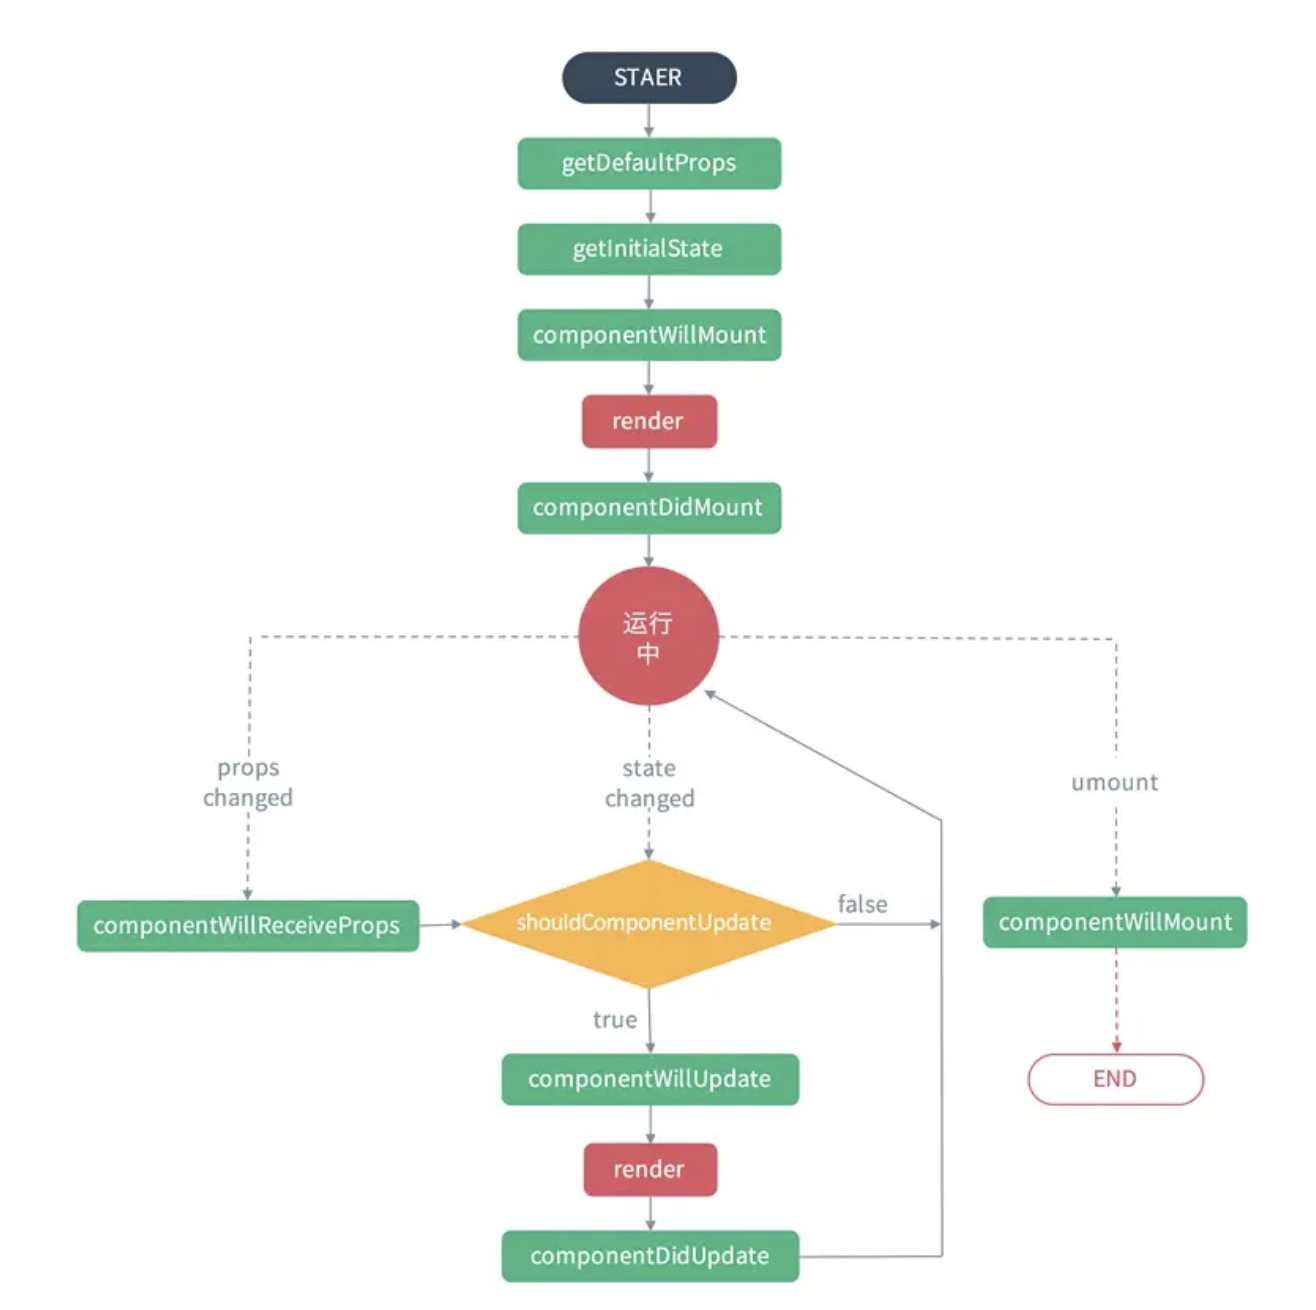
从 React 生命周期中可以看出 shouldComponentUpdate 这个节点的生命周期关系到是否重新 Render 组件。对 shouldComponentUpdate 的手动触发也是组件性能优化的一个重要手段。
# React 基础实例
编写一个 hello world 组件,JSX 语法编译成 React.createElement 包装的函数。
import React from "react";

export default class extends React.PureComponent {
  render() {
    return (
      <div className="App">
        <h1>Hello boy</h1>
        <h2>Welcome</h2>
      </div>
    );
  }
}

## 编译后的结果
return React.createElement('div', {className: 'App'},
  React.createElement('h1', /* ... h1 children ... */),
  React.createElement('h2', /* ... h2 children ... */)
);
同时在当前版本的 React 中,支持编写函数式组件,官方称为 Function Component。通过 Webpack 的 Babel @babel/preset-react 支持编译成 Javascript 语法。
# Portals 传送门
Portals 提供了一种很好的将子节点渲染到父组件以外的 DOM 节点的方式。
ReactDOM.createPortal(child, container)
第一个参数( child )是任何可渲染的 React 子元素,例如一个元素,字符串或碎片。第二个参数(container)则是一个 DOM 元素。
render() {
  return ReactDOM.createPortal(
    <Component />,
    domNode,
  );
}
通常讲,当你从组件的 render 方法返回一个元素,该元素仅能装配 DOM 节点中离其最近的父元素。在 React@^16 中的这个特性可以动态插入到任何 DOM 节点的位置。 这种方式在编写 Modal, Dialog, Toast 等全局节点组件中很有用。
在 CodePen 上试一试 (opens new window)
# Context 上下文
在 React@v16.3.0 版本中引入 Context 的 API, Context 通过组件树提供了一个传递数据的方法,从而避免了在每一个层级手动的传递 Props 属性。通过 Context 数据共享的方式,保证组件数据不需要使用 Props 属性,实现跨级传输。 Context 详细API参考文档 (opens new window)
Context 设计目的是为共享那些被认为对于一个组件树而言是“全局”的数据。下面例子来说明 Props 和 Context 数据通信的区别。
# 使用 Props 实例
class App extends React.Component {
  render() {
    return <Toolbar theme="dark" />;
  }
}

function Toolbar(props) {
  return (
    <div>
      <ThemedButton theme={props.theme} />
    </div>
  );
}

class ThemedButton extends React.Component {
  render() {
    return <Button theme={this.props.theme} />;
  }
}
# 使用 Context 实例
React.createContext 方法创建 Context 实例,创建了一对 { Provider, Consumer }。 当 React 渲染 Context 组件 Consumer 时,它将从组件树的上层中最接近的匹配的 Provider 读取当前的 context 值。
// 创建 Context 实例
const ThemeContext = React.createContext('light');

class App extends React.Component {
  render() {
    return (
      // 提供 `Provider` 上下文容器
      <ThemeContext.Provider value="dark">
        <Toolbar />
      </ThemeContext.Provider>
    );
  }
}

// 返回 Toobar 组件函数
function Toolbar(props) {
  return (
    <div>
      <ThemedButton />
    </div>
  );
}

// 构建组件实例
class ThemedButton extends React.Component {d
  static contextType = ThemeContext;
  render() {
    return <Button theme={this.context} />;
  }
}
# React Hooks
With React 16.8, React Hooks are available in a stable release! - February 06, 2019
现在 React Hooks 已经提案到了最终的标准, 读者之前开发过 React 相关的项目,都会遇到如下问题:
It’s hard to reuse stateful logic between components不同组件之间的状态很难复用。Complex components become hard to understand复杂组件导致很难理解Classes confuse both people and machines大量的类定义导致很难维护。hooks let you use more of React’s features without classes.React Hooks 开发组件也变得越来越轻量级。
技术的发展路径总是逐步降低其门槛,简单从轻量级角度我们做一个排序:
createClass Component > Class Component > Function Component
React Hooks 动机也是为了解决 React 项目开发与维护的成本,Hooks 和 Function Compenent 配合让开发者不需要定义类,更加轻量级。
如下实例:
import React, { useState } from 'react';

function App() {
  // Declare a new state variable, which we'll call "count"
  const [count, setCount] = useState(0);
  return (
    <div class="App">
      <p>You clicked {count} times</p>
      <button onClick={() => setCount(count + 1)}>
        Click me
      </button>
    </div>
  );
}
export default App;
Hooks 有几个关键 API: useState、useEffect、useContext 、useContext。 下面带大家一起了解下这些API的使用,以及他们解决的问题。
# State Hooks
State Hooks API 为了解决组件内部状态难复用的问题,以轻量级隔离的方式创建状态和更改状态。
const [state, setState] = useState(InitialState)
state 为状态名称, setState 为更改状态函数(当然可以去其他的,例如上文 setCount), InitialState 状态初始值。
也可以使用多个状态变量,这样的关系中维护写法做到了去中心化。
## 之前 state 语法
this.state = {
    fruit: 'banana',
    age: 42,
    todos: 'Lerna Hooks'
};

this.setState({fruit: 'orange'});

## 现在 useState 语法
const [age, setAge] = useState(42);
const [fruit, setFruit] = useState('banana');
const [todos, setTodos] = useState([{ text: 'Learn Hooks' }]);

setFruit('orange');
# Effect Hooks
Effect Hooks 副作用钩子 API 为了链接组件生命周期,让组件更加简单。 Effect Hooks 可以同时在 componentDidMount 和 componentDidUpdate 上触发,同时返回会在 componentWillUnmount 的时候触发。 可以使用它代替一些生命周期,使书写更加简洁。
关于生命周期,使用 useEffect 基本解决了在 Fuction Component 无生命周期的问题
# 不使用 Effect
import React from 'react';

class NoEffect extends React.PureComponent {
  constructor(props) {
    super(props);
    this.state = {
      count: 0
    };
  }

  componentDidMount() {
    document.title = `You clicked ${this.state.count} times`;
  }

  componentDidUpdate() {
    document.title = `You clicked ${this.state.count} times`;
  }

  render() {
    return (
      <div>
        <p>You clicked {this.state.count} times</p>
        <button onClick={() => this.setState({ count: this.state.count + 1 })}>
          Click me
        </button>
      </div>
    );
  }
}
export default NoEffect;
# 使用 Effect
import React, { useState, useEffect } from 'react';

function UseEffect() {
  const [count, setCount] = useState(0);

  useEffect(() => {
    document.title = `You clicked ${count} times`;
  });

  return (
    <div>
      <p>You clicked {count} times</p>
      <button onClick={() => setCount(count + 1)}>
        Click me
      </button>
    </div>
  );
}

export default UseEffect;
# Reducer Hooks
useReducer Hooks 可以模拟 Redux 的 reducer 行为,进行数据流转。 下面语法返回 state 和 dispatch 两个属性
const [state, dispatch] = useReducer(reducer, initialArg, init);
# 使用 useReducers
// 初始化状态
const initialState = {count: 0};

// reducer规则
function reducer(state, action) {
  switch (action.type) {
    case 'increment':
      return {count: state.count + 1};
    case 'decrement':
      return {count: state.count - 1};
    default:
      throw new Error();
  }
}

function Counter({initialCount}) {
  const [state, dispatch] = useReducer(reducer, initialState);
  return (
    <>
      Count: {state.count}
      <button onClick={() => dispatch({type: 'increment'})}>+</button>
      <button onClick={() => dispatch({type: 'decrement'})}>-</button>
    </>
  );
}
# useState 实现 useReducer
useState API 原理公式是:
(state, action) => newState
useReducer 返回 dispatch 方法来触发状态的改变。 如下有通过 useState 实现案例。 useReducer源码实现:
function useReducer(reducer, initialState) {
  const [state, setState] = useState(initialState);

  function dispatch(action) {
    const nextState = reducer(state, action);
    setState(nextState);
  }

  return [state, dispatch];
}
# React的高阶组件
HOC(Higher Order Component,高阶组件),它不是 React 的组件,而是一种设计模式。
理解:高阶组件就是一个函数,且该函数接受一个组件作为参数,并返回一个新的组件, 同时函数执行创建了闭包环境。
计算公式如下:
const EnhancedComponent = higherOrderComponent(WrappedComponent);
HOC 组件可以封装组件中通用的组件,可变的组件可以通过传入子组件的方式,提高代码复用性。
# 高阶组件实例
function HOC(WrappedComponent) {
  return class extends React.Component {
    render() {
      return <WrappedComponent {...this.props}/>
    }
  }
}
注释:这里的 HOC 是一个方法,接受一个 WrappedComponent 作为方法的参数,返回一个匿名 class,renderWrappedComponent。
# 结语
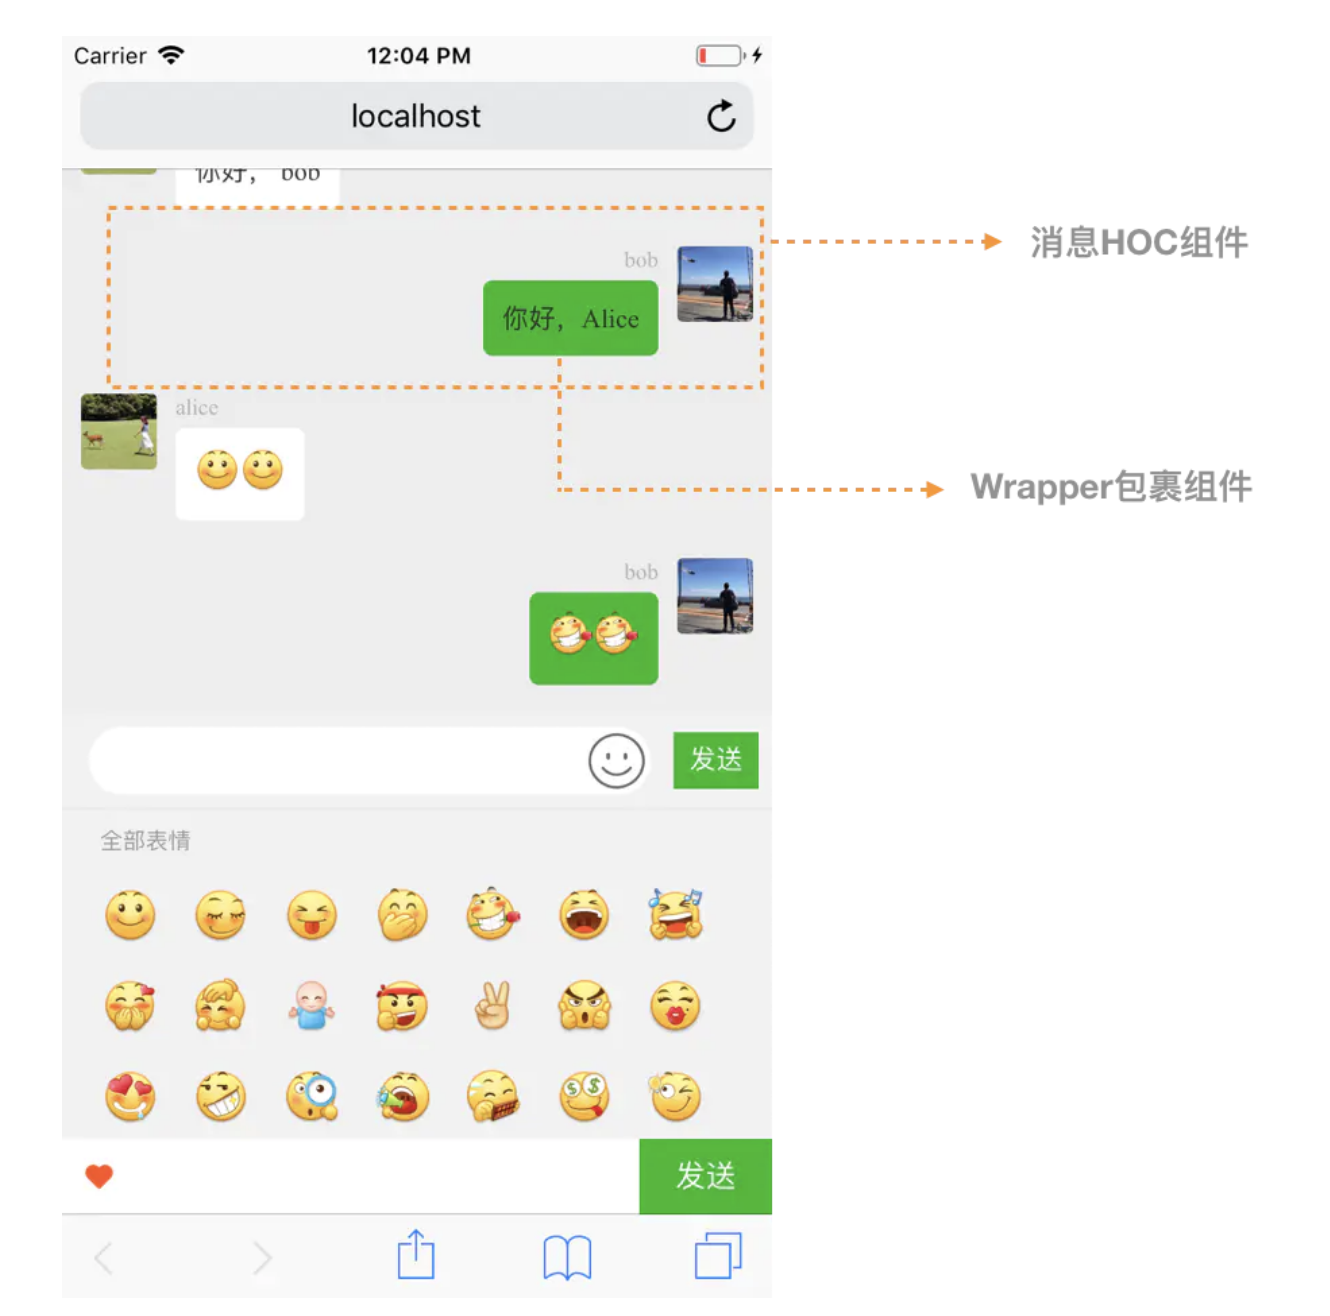
本章和大家一起来学习下 React 中的两个重要特性( Portals 和 Context ) 和 一个核心概念 ( Hooks ),通过本章学习读者可以知道为什么需要 Hooks , 以及它的适用场景,最后和大家一起编写一个消息流 React HOC 组件。
下一章将要学习 Mobx 状态管理, 大家需要提前了解下 Mobx基本概念, 同时最好了解下 Redux 的原理,下一章会思考 Mobx 和 Redux 的差异和不同的使用场景。
参考文档:
# 思考题
Q: 编写一个 HOC 组件之消息流 HOC 组件,UI 如下,传入不同的 wrapper 组件,展示不同消息项。
# 参考文档


