# 1.1 路由配置
我们来看一下
CLI给我们生成的router.js文件的配
/* router.js */

import Vue from 'vue'
import Router from 'vue-router'
import Home from './views/Home.vue' // 引入 Home 组件
import About from './views/About.vue' // 引入 About 组件

Vue.use(Router) // 注册路由

export default new Router({
    routes: [{
        path: '/',
        name: 'home',
        component: Home
    }, {
        path: '/about',
        name: 'about',
        component: About
    }]
})
这份配置可以算是最基础的路由配置,有以下几点需要进行优化:
- 如果路由存在二级目录,需要添加 base 属性,否则默认为
"/" - 默认路由模式是
hash模式,会携带 # 标记,与真实url不符,可以改为history模式 - 页面组件没有进行按需加载,可以使用
require.ensure()来进行优化
下面是我们优化结束的代码:
/* router.js */

import Vue from 'vue'
import Router from 'vue-router'

// 引入 Home 组件
const Home = resolve => {
    require.ensure(['./views/Home.vue'], () => {
        resolve(require('./views/Home.vue'))
    })
}

// 引入 About 组件
const About = resolve => {
    require.ensure(['./views/About.vue'], () => {
        resolve(require('./views/About.vue'))
    })
}

Vue.use(Router)

let base = `${process.env.BASE_URL}` // 动态获取二级目录

export default new Router({
    mode: 'history',
    base: base,
    routes: [{
        path: '/',
        name: 'home',
        component: Home
    }, {
        path: '/about',
        name: 'about',
        component: About
    }]
})
当然,除了使用
require.ensure来拆分代码,Vue Router官方文档还推荐使用动态import语法来进行代码分块,比如上述require.ensure代码可以修改为
// 引入 Home 组件
const Home = () => import('./views/Home.vue');

// 引入 About 组件
const About = () => import('./views/About.vue');
如果你想给拆分出的文件命名,可以尝试一下 webpack 提供的 Magic Comments(魔法注释)
const Home = () => import(/* webpackChunkName:'home'*/ './views/Home.vue');
# 1.2 Vuex 配置
import Vue from 'vue'
import Vuex from 'vuex'

Vue.use(Vuex)

export default new Vuex.Store({
    state: {

    },
    mutations: {

    },
    actions: {

    }
})
主要有 4 个核心点:
state、mutations、actions及getter
这里我用一句话介绍它们之间的关系就是:我们可以通过 actions 异步提交 mutations 去 修改 state 的值并通过 getter 获取
└── store
    ├── index.js          # 我们组装模块并导出 store 的地方
    ├── actions.js        # 根级别的 action
    ├── mutations.js      # 根级别的 mutation
    └── modules
        ├── moduleA.js    # A模块
        └── moduleB.js    # B模块
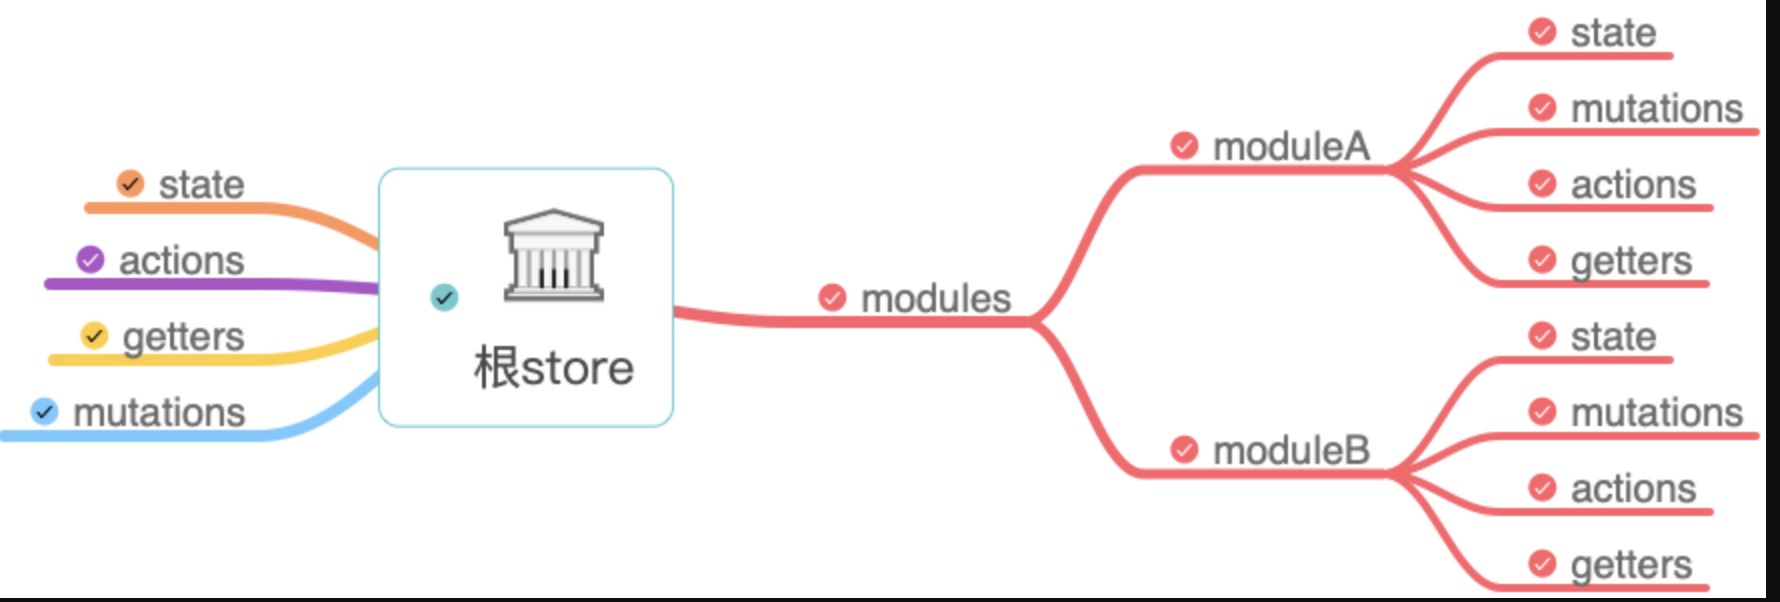
与单个
store.js文件不同的是,我们按模块进行了划分,每个模块中都可以包含自己4个核心功能。比如模块A中
/* moduleA.js */

const moduleA = {
    state: {
        text: 'hello'
    },
    mutations: {
        addText (state, txt) {
            // 这里的 `state` 对象是模块的局部状态
            state.text += txt
        }
    },

    actions: {
        setText ({ commit }) {
            commit('addText', ' world')
        }
    },

    getters: {
        getText (state) {
            return state.text + '!'
        }
    }
}

export default moduleA
/* index.js */

import Vue from 'vue'
import Vuex from 'vuex'
import moduleA from './modules/moduleA'
import moduleB from './modules/moduleB'
import { mutations } from './mutations'
import actions from './actions'

Vue.use(Vuex)

export default new Vuex.Store({
    state: {
        groups: [1]
    },
    modules: {
        moduleA, // 引入 A 模块
        moduleB, // 引入 B 模块
    },
    actions, // 根级别的 action
    mutations, // 根级别的 mutations

    // 根级别的 getters
    getters: {
        getGroups (state) {
            return state.groups
        }
    }
})
这样项目中状态的模块划分就更加清晰,对应模块的状态我们只需要修改相应模块文件即可
# 1.3 接口配置
我们可以在 src 目录下新建 services 文件夹用于存放接口文件:
└── src
    └── services
        ├── http.js      # 接口封装
        ├── moduleA.js    # A模块接口
        └── moduleB.js    # B模块接口
/* http.js */
import 'whatwg-fetch'

// HTTP 工具类
export default class Http {
    static async request(method, url, data) {
        const param = {
            method: method,
            headers: {
                'Content-Type': 'application/json'
            }
        };

        if (method === 'GET') {
            url += this.formatQuery(data)
        } else {
            param['body'] = JSON.stringify(data)
        }

        // Tips.loading(); // 可调用 loading 组件

        return fetch(url, param).then(response => this.isSuccess(response))
                .then(response => {
                    return response.json()
            })
    }

    // 判断请求是否成功
    static isSuccess(res) {
        if (res.status >= 200 && res.status < 300) {
            return res
        } else {
            this.requestException(res)
        }
    }

    // 处理异常
    static requestException(res) {
        const error = new Error(res.statusText)

        error.response = res

        throw error
    }

    // url处理
    static formatQuery(query) {
        let params = [];

        if (query) {
            for (let item in query) {
                let vals = query[item];
                if (vals !== undefined) {
                    params.push(item + '=' + query[item])
                }
            }
        }
        return params.length ? '?' + params.join('&') : '';
    }

    // 处理 get 请求
    static get(url, data) {
        return this.request('GET', url, data)
    }

    // 处理 put 请求
    static put(url, data) {
        return this.request('PUT', url, data)
    }

    // 处理 post 请求
    static post(url, data) {
        return this.request('POST', url, data)
    }

    // 处理 patch 请求
    static patch(url, data) {
        return this.request('PATCH', url, data)
    }

    // 处理 delete 请求
    static delete(url, data) {
        return this.request('DELETE', url, data)
    }
}
/* moduleA.js */
import Http from './http'

// 获取测试数据
export const getTestData = () => {
    return Http.get('https://api.github.com/repos/octokit/octokit.rb')
}
然后在项目页面中进行调用,会成功获取
github返回的数据,但是一般我们在项目中配置接口的时候会直接省略项目url部分,比如
/* moduleA.js */
import Http from './http'

// 获取测试数据
export const getTestData = () => {
    return Http.get('/repos/octokit/octokit.rb')
}
这时候我们再次调用接口的时候会发现其调用地址为本地地址:http://127.0.0.1:8080/repos/octokit/octokit.rb,那么为了让其指向 https://api.github.com,我们需要在 vue.config.js 中进行 devServer 的配置
/* vue.config.js */

module.exports = {
    ...

    devServer: {

        // string | Object 代理设置
        proxy: {

            // 接口是 '/repos' 开头的才用代理
            '/repos': {
                target: 'https://api.github.com', // 目标地址
                changeOrigin: true, // 是否改变源地址
                // pathRewrite: {'^/api': ''}
            }
        },
    }

    ...
}
# 1.4 公共设施配置
最后我们项目开发中肯定需要对一些公共的方法进行封装使用,这里我把它称之为公共设施,那么我们可以在
src目录下建一个common文件夹来存放其配置文件
└── src
    └── common
        ├── index.js      # 公共配置入口
        ├── validate.js   # 表单验证配置
        └── other.js      # 其他配置
在入口文件中我们可以向外暴露其他功能配置的模块,比如
/* index.js */
import Validate from './validate'
import Other from './other'

export {
    Validate,
    Other,
}


