JS程序的入口,将当前APP对象注册到AppRegistry组件中,AppRegistry组件是js module
import { AppRegistry } from 'react-native'
 ...省略代码

 AppRegistry.registerComponent('demo', () => Index)
# 启动流程
- 我们新建一个RN的项目,在原生代码中会生成
MainActivity和MainApplication两个Java类。顾名思义,MainAcitivity就是我们的Native的入口了, - 我们先来看下
MainApplication都做了哪些操作
public class MainApplication extends Application implements ReactApplication {
    //ReactNativeHost:持有ReactInstanceManager实例,做一些初始化操作。
  private final ReactNativeHost mReactNativeHost = new ReactNativeHost(this) {
    @Override
    public boolean getUseDeveloperSupport() {
      return BuildConfig.DEBUG;
    }

    @Override
    protected List<ReactPackage> getPackages() {
      return Arrays.<ReactPackage>asList(
          new MainReactPackage()
      );
    }
  };

  @Override
  public ReactNativeHost getReactNativeHost() {
    return mReactNativeHost;
  }

  @Override
  public void onCreate() {
    super.onCreate();
    //SoLoader:加载C++底层库,准备解析JS。
    SoLoader.init(this, /* native exopackage */ false);
  }
}
}
我们再来看下MainActivity的代码
public class MainActivity extends ReactActivity {

    @Override
    protected String getMainComponentName() {
        return "demo";
    }
}
可以看到其实是继承了
ReactActivity类,只是重写了getMainComponentName方法,有没有看出来,其方法的返回值和我们在JS端的值是一样的。如果不一致会怎么样,你可以自己试一下。
# ReactActivity
我们来看下
ReactActivity的方法的onCreate方法
public abstract class ReactActivity extends Activity
    implements DefaultHardwareBackBtnHandler, PermissionAwareActivity {
    private final ReactActivityDelegate mDelegate;

    ...省略代码

     @Override
  protected void onCreate(Bundle savedInstanceState) {
    super.onCreate(savedInstanceState);
    mDelegate.onCreate(savedInstanceState);
  }
}
ReactActivity全权委托给ReactActivityDelegate来处理
ReactActivityDelegate
public class ReactActivityDelegate {
      protected void onCreate(Bundle savedInstanceState) {
      // 弹框权限判断
    boolean needsOverlayPermission = false;
    if (getReactNativeHost().getUseDeveloperSupport() && Build.VERSION.SDK_INT >= Build.VERSION_CODES.M) {
      // Get permission to show redbox in dev builds.
      if (!Settings.canDrawOverlays(getContext())) {
        needsOverlayPermission = true;
        Intent serviceIntent = new Intent(Settings.ACTION_MANAGE_OVERLAY_PERMISSION, Uri.parse("package:" + getContext().getPackageName()));
        FLog.w(ReactConstants.TAG, REDBOX_PERMISSION_MESSAGE);
        Toast.makeText(getContext(), REDBOX_PERMISSION_MESSAGE, Toast.LENGTH_LONG).show();
        ((Activity) getContext()).startActivityForResult(serviceIntent, REQUEST_OVERLAY_PERMISSION_CODE);
      }
    }
        // 加载组建逻辑 mMainComponentName为getMainComponentName返回的值
    if (mMainComponentName != null && !needsOverlayPermission) {
      loadApp(mMainComponentName);
    }
    // 双击判断工具类
    mDoubleTapReloadRecognizer = new DoubleTapReloadRecognizer();
  }

  protected void loadApp(String appKey) {
     //空判断
    if (mReactRootView != null) {
      throw new IllegalStateException("Cannot loadApp while app is already running.");
    }
    // 创建 RN容器根视图
    mReactRootView = createRootView();
    mReactRootView.startReactApplication(
      getReactNativeHost().getReactInstanceManager(),
      appKey,
      getLaunchOptions());
      //将rootview添加入activity
    getPlainActivity().setContentView(mReactRootView);
  }
}
loadApp做了三件事:创建RootView、创建ReactApplication、创建ReactInstanceManager
# ReactRootView
ReactRootView是一个自定义的View,其父类是FrameLayout。因此,可以把RN看成是一个特殊的 “自定义View”。
我们来看下
startReactApplication方法
public void startReactApplication(
      ReactInstanceManager reactInstanceManager,
      String moduleName,
      @Nullable Bundle initialProperties) {
        ...省略代码
    try {
        //在UI线程中进行
      UiThreadUtil.assertOnUiThread();

      Assertions.assertCondition(
        mReactInstanceManager == null,
        "This root view has already been attached to a catalyst instance manager");
        // 赋值
      mReactInstanceManager = reactInstanceManager;
      mJSModuleName = moduleName;
      mAppProperties = initialProperties;
        // 判断ReactContext是否初始化,没有就异步进行初始化
      if (!mReactInstanceManager.hasStartedCreatingInitialContext()) {
        mReactInstanceManager.createReactContextInBackground();
      }
        //宽高计算完成后添加布局监听
      attachToReactInstanceManager();
    } finally {
      Systrace.endSection(TRACE_TAG_REACT_JAVA_BRIDGE);
    }
  }
startReactApplication中的三个参数
| 形参 | 描述 |
|---|---|
reactInstanceManager | ReactInstanceManager类型,创建和管理CatalyInstance的实例 |
moduleName | 就是之前的组件名 |
initialProperties | 是Native向JS传递的数据,以后可能由POJO代替,默认是null,需要的话要重写createReactActivityDelegate ,并重写其中getLaunchOptions方法 |
startReactApplication中调用了ReactInstanceManager的createReactContextInBackground方法。
# ReactInstanceManager
public void createReactContextInBackground() {
    //首次执行
     mHasStartedCreatingInitialContext = true;
    recreateReactContextInBackgroundInner();
}
该方法只会在
application中执行一次,JS重载时,会走recreateReactContextInBackground, 这两个方法最终都会调用recreateReactContextInBackgroundInner方法
@ThreadConfined(UI)
  private void recreateReactContextInBackgroundInner() {
    // 确保在UI线程中执行
    UiThreadUtil.assertOnUiThread();

    if (mUseDeveloperSupport && mJSMainModuleName != null &&
      !Systrace.isTracing(TRACE_TAG_REACT_APPS | TRACE_TAG_REACT_JSC_CALLS)) {
        // 调试模式,加载服务器bundle
      return;
    }
    // 加载本地bundle
    recreateReactContextInBackgroundFromBundleLoader();
  }

  @ThreadConfined(UI)
  private void recreateReactContextInBackgroundFromBundleLoader() {
    recreateReactContextInBackground(
        new JSCJavaScriptExecutor.Factory(mJSCConfig.getConfigMap()),
        mBundleLoader);
  }
| 形参 | 描述 |
|---|---|
jsExecutorFactory | C++和JS双向通信的中转站 |
jsBundleLoader | bundle加载器,根据ReactNativeHost中的配置决定从哪里加载bundle文件 |
private void recreateReactContextInBackground(
    JavaScriptExecutor.Factory jsExecutorFactory,
    JSBundleLoader jsBundleLoader) {
    UiThreadUtil.assertOnUiThread();

     //创建ReactContextInitParams对象
    final ReactContextInitParams initParams = new ReactContextInitParams(
      jsExecutorFactory,
      jsBundleLoader);
    if (mCreateReactContextThread == null) {
        // 新增线程初始化ReactContext
      runCreateReactContextOnNewThread(initParams);
    } else {
      mPendingReactContextInitParams = initParams;
    }
  }
runCreateReactContextOnNewThread中有一个核心方法createReactContext来创建ReactContext
private ReactApplicationContext createReactContext(
      JavaScriptExecutor jsExecutor,
      JSBundleLoader jsBundleLoader) {
    // 包装ApplicationContext
    final ReactApplicationContext reactContext = new ReactApplicationContext(mApplicationContext);
    //创建JavaModule注册表Builder,用来创建JavaModule注册表,JavaModule注册表将所有的JavaModule注册到CatalystInstance中。
    NativeModuleRegistryBuilder nativeModuleRegistryBuilder = new NativeModuleRegistryBuilder(
      reactContext,
      this,
      mLazyNativeModulesEnabled);
      // 创建JavaScriptModule注册表Builder
    JavaScriptModuleRegistry.Builder jsModulesBuilder = new JavaScriptModuleRegistry.Builder();
    if (mUseDeveloperSupport) {
      // 调试模式下,将错误交给DevSupportManager处理
      reactContext.setNativeModuleCallExceptionHandler(mDevSupportManager);
    }

    ...省略代码

    try {
      //创建CoreModulesPackage,其中封装了RN Framework核心功能,通信、调试等。
      CoreModulesPackage coreModulesPackage =
        new CoreModulesPackage(
          this,
          mBackBtnHandler,
          mUIImplementationProvider,
          mLazyViewManagersEnabled);
          //把各自的Module添加到对应的注册表中
      processPackage(coreModulesPackage, nativeModuleRegistryBuilder, jsModulesBuilder);
    } finally {
      Systrace.endSection(TRACE_TAG_REACT_JAVA_BRIDGE);
    }
    // 将我们Application中的ReactPackage循环处理,加入对应的注册表中。
   for (ReactPackage reactPackage : mPackages) {
        ...省略代码
      try {
        processPackage(reactPackage, nativeModuleRegistryBuilder, jsModulesBuilder);
      } finally {
        Systrace.endSection(TRACE_TAG_REACT_JAVA_BRIDGE);
      }
    }
    ...省略代码
    //生成Java注册表,将Java可调用的API暴露给JS
    NativeModuleRegistry nativeModuleRegistry;
    try {
       nativeModuleRegistry = nativeModuleRegistryBuilder.build();
    } finally {
      Systrace.endSection(TRACE_TAG_REACT_JAVA_BRIDGE);
      ReactMarker.logMarker(BUILD_NATIVE_MODULE_REGISTRY_END);
    }

    NativeModuleCallExceptionHandler exceptionHandler = mNativeModuleCallExceptionHandler != null
        ? mNativeModuleCallExceptionHandler
        : mDevSupportManager;
     //构建CatalystInstanceImpl实例
    CatalystInstanceImpl.Builder catalystInstanceBuilder = new CatalystInstanceImpl.Builder()
      .setReactQueueConfigurationSpec(mUseSeparateUIBackgroundThread ?
        ReactQueueConfigurationSpec.createWithSeparateUIBackgroundThread() :
        ReactQueueConfigurationSpec.createDefault())
        //JS执行通信类
      .setJSExecutor(jsExecutor)
      //Java模块注册表
      .setRegistry(nativeModuleRegistry)
      // JS注册表
      .setJSModuleRegistry(jsModulesBuilder.build())
      // Bundle加载工具类
      .setJSBundleLoader(jsBundleLoader)
      // 异常处理器
      .setNativeModuleCallExceptionHandler(exceptionHandler);

    // 省略代码

   final CatalystInstance catalystInstance;
    try {
      catalystInstance = catalystInstanceBuilder.build();
    } finally {
        //省略代码
   }

    if (mBridgeIdleDebugListener != null) {
      catalystInstance.addBridgeIdleDebugListener(mBridgeIdleDebugListener);
    }
    if (Systrace.isTracing(TRACE_TAG_REACT_APPS | TRACE_TAG_REACT_JSC_CALLS)) {
 //调用CatalystInstanceImpl的Native方法把Java Registry转换为Json,再由C++层传送到JS层。     catalystInstance.setGlobalVariable("__RCTProfileIsProfiling", "true");
    }

    //关联ReacContext与CatalystInstance
    reactContext.initializeWithInstance(catalystInstance);
    //通过CatalystInstance开始加载JS Bundle
    catalystInstance.runJSBundle();

    return reactContext;
  }
这段代码比较长,它主要做了这几件事:
- 创建
JavaModule注册表和JavaScriptModule注册表,交给CatalystInstance管理。 - 处理
ReactPackage,将各自的Module放入对应的注册表中。 - 通过上面的各个参数创建
CatalystInstance实例。CatalystInstance关联ReactContext,开始加载JS Bundle
# CatalystInstance
我们来看下
CatalystInstance的实现类CatalystInstanceImpl的构造方法
private CatalystInstanceImpl(
      final ReactQueueConfigurationSpec reactQueueConfigurationSpec,
      final JavaScriptExecutor jsExecutor,
      final NativeModuleRegistry registry,
      final JavaScriptModuleRegistry jsModuleRegistry,
      final JSBundleLoader jsBundleLoader,
      NativeModuleCallExceptionHandler nativeModuleCallExceptionHandler) {
    //用来创建JNI相关方法,并返回mHybridData
    mHybridData = initHybrid();
    // Android UI线程、JS线程、NativeMOdulesQueue线程
    mReactQueueConfiguration = ReactQueueConfigurationImpl.create(
        reactQueueConfigurationSpec,
        new NativeExceptionHandler());
    // 省略代码
    //调用 C++ 层代码进行初始化Bridge
    initializeBridge(
      new BridgeCallback(this),
      jsExecutor,
      mReactQueueConfiguration.getJSQueueThread(),
      mNativeModulesQueueThread,
      mUIBackgroundQueueThread,
      mJavaRegistry.getJavaModules(this),
      mJavaRegistry.getCxxModules());

  }
private native void initializeBridge(
      ReactCallback callback,
      JavaScriptExecutor jsExecutor,
      MessageQueueThread jsQueue,
      MessageQueueThread moduleQueue,
      MessageQueueThread uiBackgroundQueue,
      Collection<JavaModuleWrapper> javaModules,
      Collection<ModuleHolder> cxxModules);
| 形参 | 描述 |
|---|---|
ReactCallback | CatalystInstanceImpl的静态内部类ReactCallback,负责接口回调 |
JavaScriptExecutor | JS执行器,将JS的调用传给C++层 |
MessageQueueThread | JS线程 |
MessageQueueThread moduleQueue | Java线程 |
MessageQueueThread uiBackgroundQueue | UI背景线程 |
javaModules | java module |
cxxModules | c++ module |
createReactContext方法中用catalystInstance.runJSBundle()来加载JS bundle
@Override
  public void runJSBundle() {

    ...
    mJSBundleLoader.loadScript(CatalystInstanceImpl.this);
    ...
  }
# JSBundleLoader
CatalystInstanceImpl.runJSBundle()会调用JSBundleLoader去加载JS Bundle,由于不同的情况可能会有不同的JSBundleLoader,我们假设其中一种
public abstract class JSBundleLoader {

  /**
   * This loader is recommended one for release version of your app. In that case local JS executor
   * should be used. JS bundle will be read from assets in native code to save on passing large
   * strings from java to native memory.
   */
  public static JSBundleLoader createAssetLoader(
      final Context context,
      final String assetUrl,
      final boolean loadSynchronously) {
    return new JSBundleLoader() {
      @Override
      public String loadScript(CatalystInstanceImpl instance) {
        instance.loadScriptFromAssets(context.getAssets(), assetUrl, loadSynchronously);
        return assetUrl;
      }
    };
  }
可以看到它会继续调用
CatalystInstance中的loadScriptFromAssets方法
public class CatalystInstanceImpl {

  /* package */ void loadScriptFromAssets(AssetManager assetManager, String assetURL) {
    mSourceURL = assetURL;
    jniLoadScriptFromAssets(assetManager, assetURL);
  }

  private native void jniLoadScriptFromAssets(AssetManager assetManager, String assetURL);

}
最终呢,还是会调用
CatalystInstanceImpl.cpp去加载JS Bundle,我们去C++层看一下实现
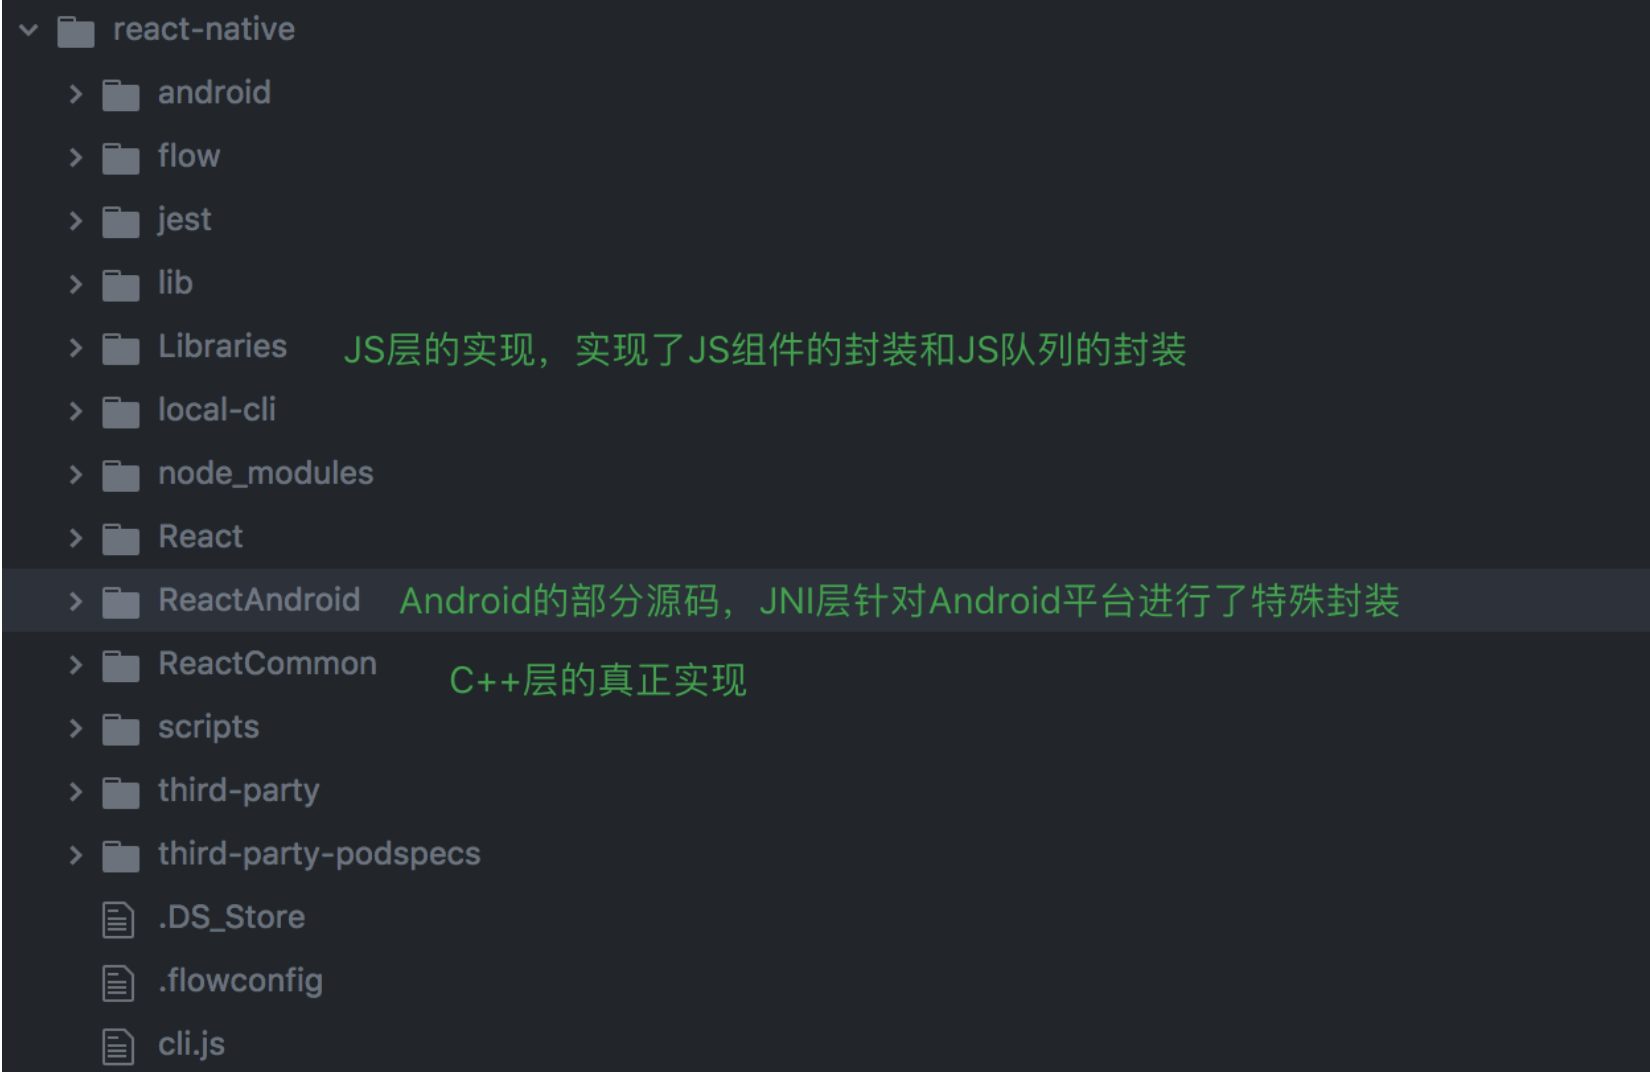
我们先看下源码的结构图
# CatalystInstanceImpl.cpp
在ReactAndroid的Jni中,我们看下相关代码:
void CatalystInstanceImpl::jniLoadScriptFromAssets(
    jni::alias_ref<JAssetManager::javaobject> assetManager,
    const std::string& assetURL,
    bool loadSynchronously) {
  const int kAssetsLength = 9;  // strlen("assets://");
  // 获取soure js Bundle的路径名
  auto sourceURL = assetURL.substr(kAssetsLength);
  // 获取AssetManager
  auto manager = extractAssetManager(assetManager);
  // 读取JS Bundle里的内容
  auto script = loadScriptFromAssets(manager, sourceURL);
  // unbundle命令打包判断
  if (JniJSModulesUnbundle::isUnbundle(manager, sourceURL)) {
    instance_->loadUnbundle(
      folly::make_unique<JniJSModulesUnbundle>(manager, sourceURL),
      std::move(script),
      sourceURL,
      loadSynchronously);
    return;
  } else {
    //bundle命令打包走次流程,instance_是Instan.h中类的实例
    instance_->loadScriptFromString(std::move(script), sourceURL, loadSynchronously);
  }
}
# Instance.cpp
void Instance::loadScriptFromString(std::unique_ptr<const JSBigString> string,
                                    std::string sourceURL,
                                    bool loadSynchronously) {
  SystraceSection s("reactbridge_xplat_loadScriptFromString", "sourceURL", sourceURL);
  if (loadSynchronously) {
    loadApplicationSync(nullptr, std::move(string), std::move(sourceURL));
  } else {
    loadApplication(nullptr, std::move(string), std::move(sourceURL));
  }
}

void Instance::loadApplicationSync(
    std::unique_ptr<JSModulesUnbundle> unbundle,
    std::unique_ptr<const JSBigString> string,
    std::string sourceURL) {
  std::unique_lock<std::mutex> lock(m_syncMutex);
  m_syncCV.wait(lock, [this] { return m_syncReady; });

  SystraceSection s("reactbridge_xplat_loadApplicationSync", "sourceURL", sourceURL);
  //nativeToJsBridge_也是在Instance::initializeBridget()方法里初始化的,具体实现在NativeToJsBridge.cpp里。
  nativeToJsBridge_->loadApplicationSync(std::move(unbundle), std::move(string), std::move(sourceURL));
}
NativeToJsBridge.cpp
void NativeToJsBridge::loadApplication(
    std::unique_ptr<JSModulesUnbundle> unbundle,
    std::unique_ptr<const JSBigString> startupScript,
    std::string startupScriptSourceURL) {

  //获取一个MessageQueueThread,探后在线程中执行一个Task。
  runOnExecutorQueue(
      m_mainExecutorToken,
      [unbundleWrap=folly::makeMoveWrapper(std::move(unbundle)),
       startupScript=folly::makeMoveWrapper(std::move(startupScript)),
       startupScriptSourceURL=std::move(startupScriptSourceURL)]
        (JSExecutor* executor) mutable {

    auto unbundle = unbundleWrap.move();
    if (unbundle) {
      executor->setJSModulesUnbundle(std::move(unbundle));
    }

    //executor从runOnExecutorQueue()返回的map中取得,与OnLoad中的JSCJavaScriptExecutorHolder对应,也与
    //Java中的JSCJavaScriptExecutor对应。它的实例在JSExecutor.cpp中实现。
    executor->loadApplicationScript(std::move(*startupScript),
                                    std::move(startupScriptSourceURL));
  });
}
unbundle命令,使用方式和bundle命令完全相同。unbundle命令是在bundle命令的基础上增加了一项功能,除了生成整合JS文件index.android.bundle外,还会 生成各个单独的未整合JS文件(但会被优化),全部放在js-modules目录下,同时会生成一个名为UNBUNDLE的标识文件,一并放在其中。UNBUNDLE标识文件的前4个字节 固定为0xFB0BD1E5,用于加载前的校验。
- 该函数进一步调用
JSExecutor.cpp的loadApplicationScript()方法。 - 到了这个方法,就是去真正加载JS文件了。
JSCExecutor.cpp
void JSCExecutor::loadApplicationScript(std::unique_ptr<const JSBigString> script, std::string sourceURL) {

    ...
    //使用Webkit JSC去解释执行JS
    evaluateSourceCode(m_context, bcSourceCode, jsSourceURL);
    flush();
}
void JSCExecutor::flush() {
    ...
    //绑定bridge,核心就是通过getGlobalObject()将JS与C++通过Webkit jSC实现绑定
      bindBridge();
      //返回给callNativeModules
    callNativeModules(m_flushedQueueJS->callAsFunction({}));
    ...
}
void JSCExecutor::callNativeModules(Value&& value) {
    ...
    //把JS层相关通信数据转换为JSON格式
    auto calls = value.toJSONString();
    //m_delegate为JsToNativeBridge对象。
    m_delegate->callNativeModules(*this, folly::parseJson(calls), true);
    ...
}
m_flushedQueueJS支线的是MessageQueue.js的flushedQueue()方法,此时JS已经被加载到队列中,等待Java层来驱动它。JS Bundle加载并解析完成后,我们回到Java代码中看看后续的流程- 我们在之前的
runCreateReactContextOnNewThread方法中,在creatReactContext之后还有一句核心的代码
setupReactContext(reactApplicationContext);
这就是加载
JS Bundle之后执行的代码
public class ReactInstanceManager {
    private void setupReactContext(ReactApplicationContext reactContext) {
        ...
        // Native Java module初始化
    catalystInstance.initialize();
    //重置ReactContext
    mDevSupportManager.onNewReactContextCreated(reactContext);
   //内存状态回调设置 mMemoryPressureRouter.addMemoryPressureListener(catalystInstance);
    // 复位生命周期
    moveReactContextToCurrentLifecycleState();

    ReactMarker.logMarker(ATTACH_MEASURED_ROOT_VIEWS_START);
    synchronized (mAttachedRootViews) {
    //mAttachedRootViews保存的是ReactRootView
      for (ReactRootView rootView : mAttachedRootViews) {
        attachRootViewToInstance(rootView, catalystInstance);
      }
    }
    ...
    }
}

private void attachMeasuredRootViewToInstance (     final ReactRootView rootView,
      CatalystInstance catalystInstance) {
      ...
            //将ReactRootView作为根布局
    UIManagerModule uiManagerModule = catalystInstance.getNativeModule(UIManagerModule.class);
    int rootTag = uiManagerModule.addMeasuredRootView(rootView);
    //设置相关
    rootView.setRootViewTag(rootTag);
    rootView.runApplication();
    ...
      }
 /* package */ void runApplication() {
        ...
      CatalystInstance catalystInstance = reactContext.getCatalystInstance();

      WritableNativeMap appParams = new WritableNativeMap();
      appParams.putDouble("rootTag", getRootViewTag());
      @Nullable Bundle appProperties = getAppProperties();
      if (appProperties != null) {
        appParams.putMap("initialProps", Arguments.fromBundle(appProperties));
      }

      String jsAppModuleName = getJSModuleName();
      //启动流程入口:由Java层调用启动
      catalystInstance.getJSModule(AppRegistry.class).runApplication(jsAppModuleName, appParams);
      ...
  }
可以看到,最终调用的是
catalystInstance.getJSModule(AppRegistry.class).runApplication(jsAppModuleName, appParams),AppRegistry.class是JS层暴露给Java层的接口方法。它的真正实现在AppRegistry.js里,AppRegistry.js是运行所有RN应用的JS层入口,我们来看看它的实现:
- 在
Libraries/ReactNative中的AppRegistry.js
# AppRegistry.js
runApplication(appKey: string, appParameters: any): void {
    const msg =
      'Running application "' + appKey + '" with appParams: ' +
      JSON.stringify(appParameters) + '. ' +
      '__DEV__ === ' + String(__DEV__) +
      ', development-level warning are ' + (__DEV__ ? 'ON' : 'OFF') +
      ', performance optimizations are ' + (__DEV__ ? 'OFF' : 'ON');
    infoLog(msg);
    BugReporting.addSource('AppRegistry.runApplication' + runCount++, () => msg);
    invariant(
      runnables[appKey] && runnables[appKey].run,
      'Application ' + appKey + ' has not been registered.\n\n' +
      'Hint: This error often happens when you\'re running the packager ' +
      '(local dev server) from a wrong folder. For example you have ' +
      'multiple apps and the packager is still running for the app you ' +
      'were working on before.\nIf this is the case, simply kill the old ' +
      'packager instance (e.g. close the packager terminal window) ' +
      'and start the packager in the correct app folder (e.g. cd into app ' +
      'folder and run \'npm start\').\n\n' +
      'This error can also happen due to a require() error during ' +
      'initialization or failure to call AppRegistry.registerComponent.\n\n'
    );

    SceneTracker.setActiveScene({name: appKey});
    runnables[appKey].run(appParameters);
  }
- 到这里就会去调用JS进行渲染,在通过
UIManagerModule将JS组件转换成Android组件,最终显示在ReactRootView上。 - 最后总结一下,就是先在应用终端启动并创建上下文对象,启动
JS Runtime,进行布局,将JS端的代码通过C++层,UIManagerMoodule转化成Android组件,再进行渲染,最后将渲染的View添加到ReactRootView上,最终呈现在用户面前。
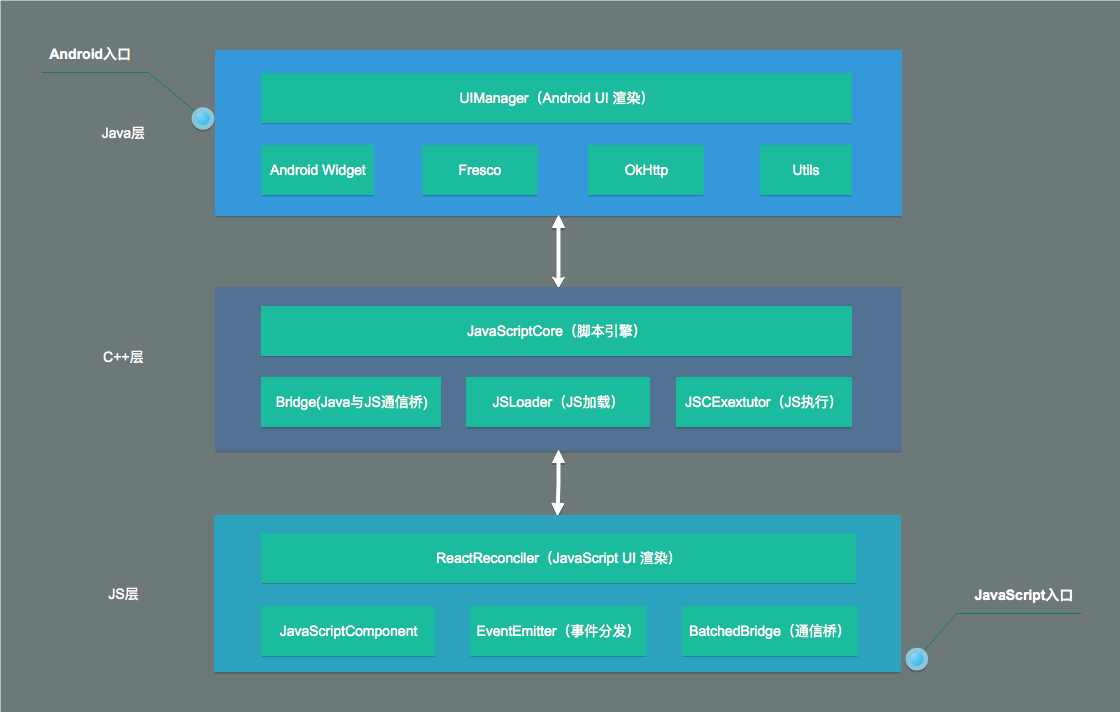
# 系统框架图
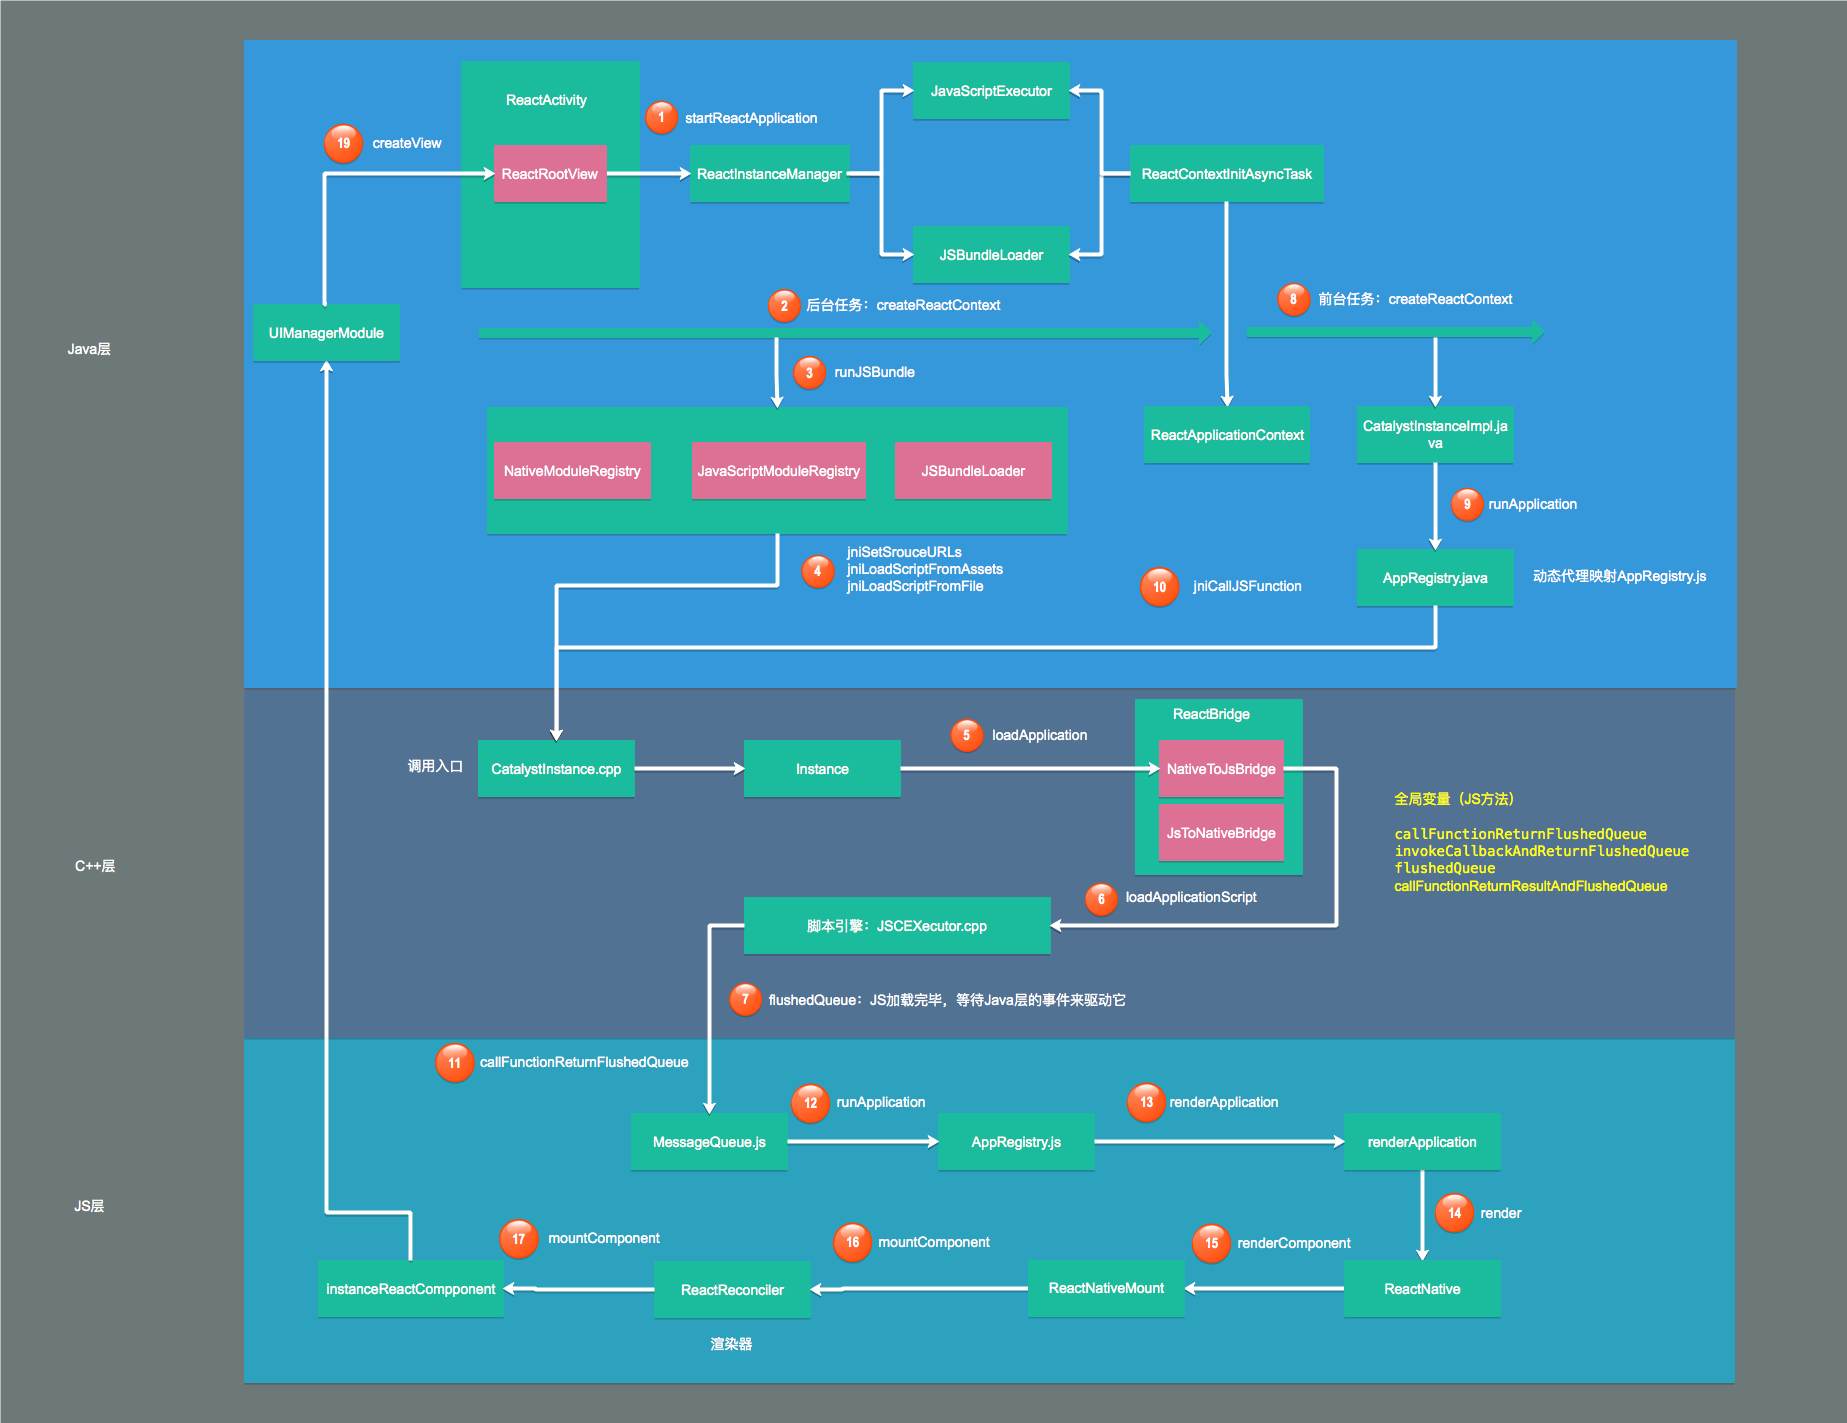
# 启动流程图