# 一、 npm run export导出文件上传到CDN
在项目中执行
npm run export后导出outCDN文件上传到CDN
// scripts/upload.js

const fs = require('fs');
const path = require('path');
const OSS = require('ali-oss');

const filePath = path.join(__dirname,'../outCDN');
const excludeFiles = ['index.html']

const client = new OSS({
  region: 'oss-cn-shenzhen',
  accessKeyId: '',
  accessKeySecret: '',
  bucket: ''
});

// 遍历文件夹中所有文件
async function uploadFile(filePath){
    //根据文件路径读取文件,返回文件列表
    fs.readdir(filePath,async function(err,files){
        if(err){
            console.warn(err)
        }else{
            //遍历读取到的文件列表
            files.forEach(async function(filename){
                //获取当前文件的绝对路径
                const filedir = path.join(filePath,filename);
                //根据文件路径获取文件信息,返回一个fs.Stats对象
                fs.stat(filedir,async function(eror,stats){
                    if(eror){
                        console.warn('获取文件stats失败');
                    }else{
                        const isFile = stats.isFile();//是文件
                        const isDir = stats.isDirectory();//是文件夹
                        if(!excludeFiles.includes(filename) && isFile){
                            const fileKey = `${filedir.split('outCDN/').pop()}`

                            try {
                                // object表示上传到OSS的Object名称,localfile表示本地文件或者文件路径
                                let data = await client.put(fileKey,filedir);

                                console.error('upload success: %j', data);
                            } catch(err) {
                                console.error('upload failed: %j', err);
                            }
                        }
                        if(isDir){
                            uploadFile(filedir);//递归,如果是文件夹,就继续遍历该文件夹下面的文件
                        }
                    }
                })
            });
        }
    });
}


uploadFile(filePath)
# 二、处理next build后的文件
执行
next build以后,把.next、package.json、server.js、next.config.js、ecosystem.json拷贝到一个文件夹统一管理,最后部署这个文件夹下的内容即可
// scripts/copyFiles.js

const fs = require( 'fs' ),
    stat = fs.stat;

const path = require('path')

const includeFiles = ['package.json','server.js','next.config.js','ecosystem.json']

/*
 * 复制目录中的所有文件包括子目录
 * @param{ String } 需要复制的目录
 * @param{ String } 复制到指定的目录
 */
const readDir = function( src, dst ){
    // 读取目录中的所有文件/目录
    fs.readdir( src, function( err, paths ){
        if( err ){
            throw err;
        }
        paths.forEach(function( filename ){
            var _src = src + '/' + filename,
                _dst = dst + '/' + filename,
                readable, writable;

            stat( _src, function( err, st ){
                if( err ){
                    throw err;
                }
                // 判断是否为文件
                if( st.isFile()){
                    // 创建读取流
                    readable = fs.createReadStream( _src );
                    // 创建写入流
                    writable = fs.createWriteStream( _dst );
                    // 通过管道来传输流
                    readable.pipe( writable );
                }
                // 如果是目录则递归调用自身
                else if( st.isDirectory()){
                    copyDir( _src, _dst, readDir );
                }
            });
        });
    });
};

// 在复制目录前需要判断该目录是否存在,不存在需要先创建目录
const copyDir = function( src, dst, callback ){
    fs.exists( dst, function( exists ){
        // 已存在
        if( exists ){
            callback( src, dst );
        }
        // 不存在
        else{
            fs.mkdir( dst, function(){
                callback( src, dst );
            });
        }
    });
};

const copyFile = ()=>{
  includeFiles.forEach(filename=>{
    fs.createReadStream(path.join(__dirname,'../'+filename)).pipe(fs.createWriteStream(path.join(__dirname,'../deployBuildFiles',filename)))
    console.log('拷贝完成!')
  })
}

// 复制目录
copyDir( '.next', 'deployBuildFiles/.next', readDir);

// 拷贝文件
copyFile()
# 三、pm2之ecosystem部署项目
PM2部署应用流程,通过pm2的配置文件来部署 http://pm2.keymetrics.io/docs/usage/deployment/
# 3.1 配置部署脚本文件
在项目根目录添加
pm2的部署脚本文件ecosystem.json
部署文档详情:http://pm2.keymetrics.io/docs/usage/deployment/
{
  "apps": [
      {
        "name": "goodsapp", //pm2运行的应用名称
        "script": "server.js",//服务启动入口
        "env":{
            "COMON_VARIABLE": "true"
        },
        "env_production": {
            "NODE_ENV": "production", //env
            "HOST": "localhost"
        }
      }
  ],
  "deploy": {
      // 最后这样使用 pm2 deploy ecosystem.json production
      "production": {
          "user": "user_00",// 服务器用户名
          "host": ['192.68.1.201'],//服务器ip地址 可写多个
          "ref": "origin/master",//从指定分支拉取代码
          "repo": "http://p.yesdat.com/diffusion/49/goodsh.git",
          "path": "/data/poetry/testDir/prev-goods.yesdat.com", //上传本地目录到服务器
          "ssh_options": "StrictHostKeyChecking=no",
          "post-deploy": "npm install --registry=https://registry.npm.taobao.org && npm install && pm2 startOrRestart ecosystem.json --env production",//部署脚本
          "env": {
              "NODE_ENV": "production"
          }
      }
  }
}
或者简单
scp上传到服务器
scp -P36000 -r deployBuildFiles/.next user_00@192.168.1.201:/home/data/services/goods-prev.yesdat.com/
更多详情 http://blog.poetries.top/2018/12/03/linux-scp
# 3.2 部署Nginx配置规则
在
nginx安装目录下的vhost中新建一个xx-3000.conf的配置文件
- 在Nginx目录
/etc/nginx下执行sudo /usr/sbin/nginx -t检测配置文件是否成功

upstream goodsapp { // website项目的目录名称
  server 127.0.0.1:3000; // 服务器上的本地启动入口,端口对应项目中server.js中的端口
}

// 配置server
server {
    listen 80;
    server_name prev-goods.yesdat.com; //指向的域名

    location / {
        proxy_set_header X-Real-IP $remote_addr;
        proxy_set_header X-Forward-For $proxy_add_x_forwarded_for;
        proxy_set_header Host $http_host;
        proxy_set_header X-Nginx-Proxy true;

        proxy_pass http://goodsapp; // 请求将会转发到goodsapp的node服务下
        proxy_redirect off;
    }

    // 处理静态资源
    location ~* ^.+\.(jpg|jpeg|gif|png|ico|css|js|pdf|txt) {
        root /data/goodsapp/static; //请求转发到静态资源路径
    }
}
更多配置参考 https://github.com/poetries/poetry-configure/blob/master/nginx.conf
# 3.3 本地项目根执行的命令
pm2 deploy ecosystem.json goodsapp setup初始化pm2 deploy ecosystem.json goodsapp部署
# 3.4 部署到阿里云
第一步:配置Nginx
查看
Nginx安装路径which nginx注意/etc/nginx和/usr/local/nginx/下的nginx区别
# 切换到Nginx当前目录下
/usr/local/nginx/conf/

# 创建vhost
mkdir vhost

# 创建goodsapp-3001.conf,内容如下

server {
    listen 8080;
    server_name 39.108.74.36;# 在ifconfig的拿到的ip地址或者是公网ip,这里填公网ip,如果是域名阿里云需要备案才可以正常访问

    location / {
        proxy_set_header X-Real-IP $remote_addr;
        proxy_set_header X-Forward-For $proxy_add_x_forwarded_for;
        proxy_set_header Host $http_host;
        proxy_set_header X-Nginx-Proxy true;

        proxy_pass http://127.0.0.1:3001;# 把172.16.0.223:8080的请求转发代理到本机的3001端口
    }
}

# 在/usr/local/nginx/sbin/nginx/conf/nginx.conf下include创建的vhost文件
include /etc/nginx/vhost/*.conf; # 在文件最后include配置文件

# 在/usr/local/nginx/sbin/nginx/conf/nginx.conf下执行检测配置文件
sudo /usr/local/nginx/sbin/nginx -t

# 重新加载Nginx配置
/usr/local/nginx/sbin/nginx -s reload
一些注意事项
server_name可以是域名,也可以是ip。ip可以是本地,也可以是公网ip
本机ip

公网ip

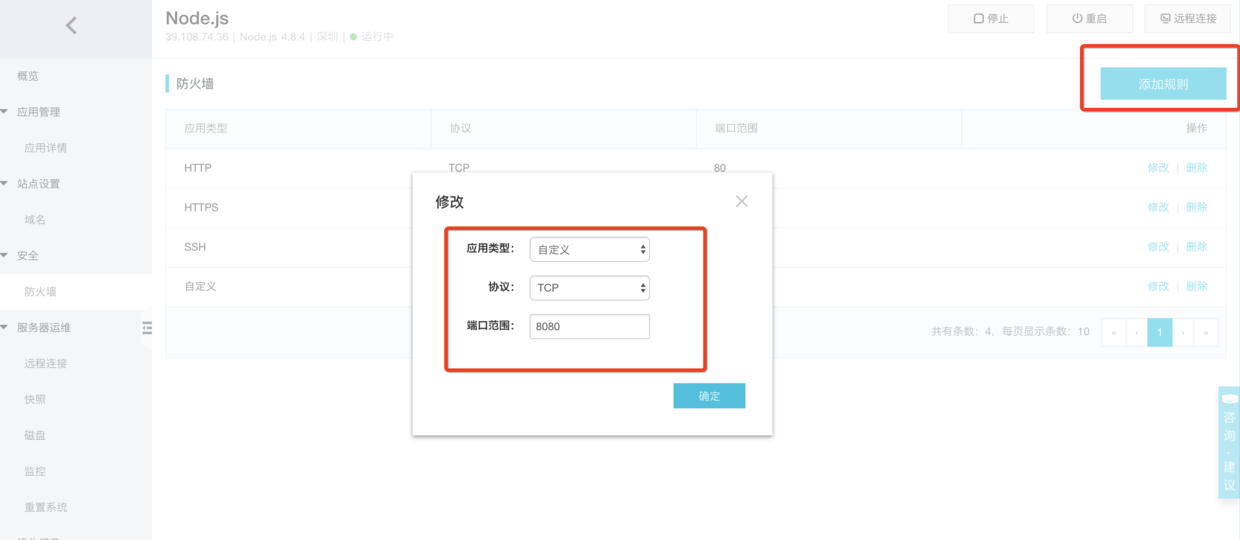
- 阿里云防火墙规则设置
这里访问了
8080需要在阿里云后台配置一下
第二步:pm2部署到服务器
首先在服务端全局安装
pm2、npmnode并且建立软链
npm i pm2 -g
重要:请注意:
一定要做建立软链这步,否则出现如下问题
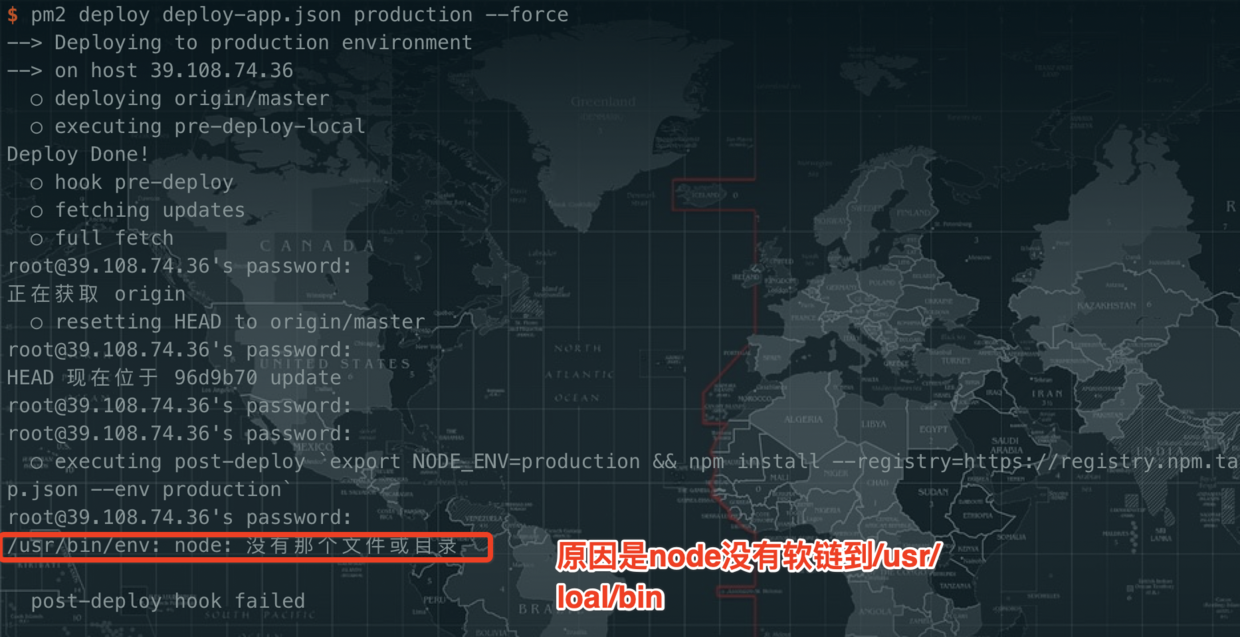
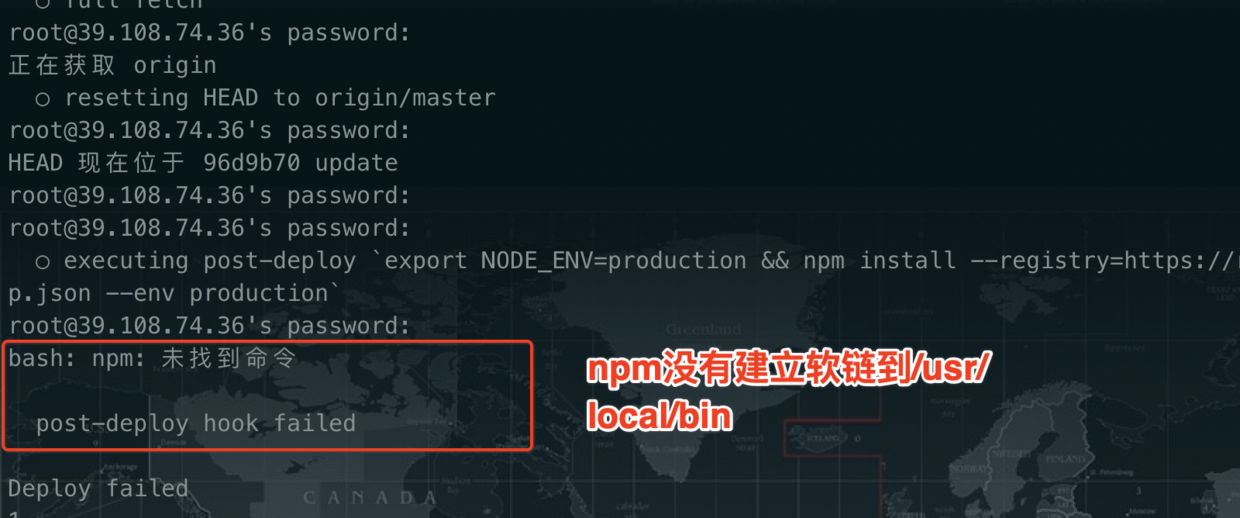
建立
npm软链

建立
node软链

建立
pm2软链

正式部署
- 根目录执行
pm2 deploy deploy-app.json production setup初始化服务端环境 - 根目录执行
pm2 deploy deploy-app.json production --force输入服务端用户root密码,部署即可
来到
/home/production目录查看上传的文件
{
    "apps": [
        {
          "name": "goodsapp-prev",
          "script": "server.js",# 根目录server.js文件
          "env":{
              "COMON_VARIABLE": "true"
          },
          "env_production": {
              "NODE_ENV": "production"
          }
        }
    ],
    "deploy": {
        "production": {
            "user": "root",//用户名
            "host": ["39.108.74.36"], //公网ip
            "ref": "origin/master",
            "repo": "https://gitee.com/Poetries1/goods-prev.yesdat.com.git",
            "path": "/home/production",
            "ssh_options": ["StrictHostKeyChecking=no", "PasswordAuthentication=no"],
            "post-deploy": "npm install && pm2 startOrRestart deploy-app.json --env production",
            "pre-deploy-local": "echo 'Deploy Done!'",
            "env": {
                "NODE_ENV": "production"
            }
        }
    }
  }
更多配置信息 http://pm2.keymetrics.io/docs/usage/deployment/
pm2 list查看启动的项目

pm2 logs查看启动日志

然后在浏览器访问
http://39.108.74.36:8080(http://公网ip:端口)即可看到,到此部署结束
# 3.5 部署更多参考


