# 一、功能类
# 1.1 html-webpack-plugin
自动生成
html,基本用法:
new HtmlWebpackPlugin({
  filename: 'index.html', // 生成文件名
  template: path.join(process.cwd(), './index.html') // 模班文件
})
# 1.2 copy-webpack-plugin
拷贝资源插件
new CopyWebpackPlugin([
  {
    from: path.join(process.cwd(), './vendor/'),
    to: path.join(process.cwd(), './dist/'),
    ignore: ['*.json']
  }
])
# 1.3 webpack-manifest-plugin && assets-webpack-plugin
俩个插件效果一致,都是生成编译结果的资源单,只是资源单的数据结构不一致而已
webpack-manifest-plugin 基本用法
module.exports = {
  plugins: [
    new ManifestPlugin()
  ]
}
assets-webpack-plugin 基本用法
module.exports = {
  plugins: [
    new AssetsPlugin()
  ]
}
# 1.4 clean-webpack-plugin
在编译之前清理指定目录指定内容
// 清理目录
const pathsToClean = [
  'dist',
  'build'
]

// 清理参数
const cleanOptions = {
  exclude:  ['shared.js'], // 跳过文件
}
module.exports = {
  // ...
  plugins: [
    new CleanWebpackPlugin(pathsToClean, cleanOptions)
  ]
}
# 1.5 compression-webpack-plugin
提供带
Content-Encoding编码的压缩版的资源
module.exports = {
  plugins: [
    new CompressionPlugin()
  ]
}
# 1.6 progress-bar-webpack-plugin
编译进度条插件
module.exports = {
  //...
  plugins: [
    new ProgressBarPlugin()
  ]
}
# 二、代码相关类
# 2.1 webpack.ProvidePlugin
自动加载模块,如
$出现,就会自动加载模块;$默认为'jquery'的exports
new webpack.ProvidePlugin({
  $: 'jquery',
})
# 2.2 webpack.DefinePlugin
定义全局常量
new webpack.DefinePlugin({
  'process.env': {
    NODE_ENV: JSON.stringify(process.env.NODE_ENV)
  }
})
# 2.3 mini-css-extract-plugin && extract-text-webpack-plugin
提取css样式,对比
mini-css-extract-plugin为webpack4及以上提供的plugin,支持css chunkextract-text-webpack-plugin只能在webpack3及一下的版本使用,不支持css chunk
基本用法 extract-text-webpack-plugin
const ExtractTextPlugin = require("extract-text-webpack-plugin");

module.exports = {
  module: {
    rules: [
      {
        test: /\.css$/,
        use: ExtractTextPlugin.extract({
          fallback: "style-loader",
          use: "css-loader"
        })
      }
    ]
  },
  plugins: [
    new ExtractTextPlugin("styles.css"),
  ]
}
基本用法 mini-css-extract-plugin
const MiniCssExtractPlugin = require("mini-css-extract-plugin");
module.exports = {
    module: {
    rules: [
      {
        test: /\.css$/,
        use: [
          {
            loader: MiniCssExtractPlugin.loader,
            options: {
              publicPath: '/'  // chunk publicPath
            }
          },
          "css-loader"
        ]
      }
    ]
  },
  plugins: [
    new MiniCssExtractPlugin({
      filename: "[name].css", // 主文件名
      chunkFilename: "[id].css"  // chunk文件名
    })
  ]
}
# 三、编译结果优化类
# 3.1 wbepack.IgnorePlugin
忽略
regExp匹配的模块
new webpack.IgnorePlugin(/^\.\/locale$/, /moment$/)
# 3.2 uglifyjs-webpack-plugin
代码丑化,用于js压缩
module.exports = {
  //...
  optimization: {
    minimizer: [new UglifyJsPlugin({
      cache: true,   // 开启缓存
      parallel: true, // 开启多线程编译
      sourceMap: true,  // 是否sourceMap
      uglifyOptions: {  // 丑化参数
        comments: false,
        warnings: false,
        compress: {
          unused: true,
          dead_code: true,
          collapse_vars: true,
          reduce_vars: true
        },
        output: {
          comments: false
        }
      }
    }]
  }
};
# 3.3 optimize-css-assets-webpack-plugin
css压缩,主要使用
cssnano压缩器 https://github.com/cssnano/cssnano
module.exports = {
  //...
  optimization: {
    minimizer: [new OptimizeCssAssetsPlugin({
      cssProcessor: require('cssnano'),   // css 压缩优化器
      cssProcessorOptions: { discardComments: { removeAll: true } } // 去除所有注释
    })]
  }
};
# 3.4 webpack-md5-hash
使你的
chunk根据内容生成md5,用这个md5取代webpack chunkhash。
var WebpackMd5Hash = require('webpack-md5-hash');

module.exports = {
  // ...
  output: {
    //...
    chunkFilename: "[chunkhash].[id].chunk.js"
  },
  plugins: [
    new WebpackMd5Hash()
  ]
};
# 3.5 SplitChunksPlugin
CommonChunkPlugin的后世,用于chunk切割。
webpack把chunk分为两种类型,一种是初始加载initial chunk,另外一种是异步加载async chunk,如果不配置SplitChunksPlugin,webpack会在production的模式下自动开启,默认情况下,webpack会将node_modules下的所有模块定义为异步加载模块,并分析你的entry、动态加载(import()、require.ensure)模块,找出这些模块之间共用的node_modules下的模块,并将这些模块提取到单独的chunk中,在需要的时候异步加载到页面当中,其中默认配置如下
module.exports = {
  //...
  optimization: {
    splitChunks: {
      chunks: 'async', // 异步加载chunk
      minSize: 30000,
      maxSize: 0,
      minChunks: 1,
      maxAsyncRequests: 5,
      maxInitialRequests: 3,
      automaticNameDelimiter: '~', // 文件名中chunk分隔符
      name: true,
      cacheGroups: {
        vendors: {
          test: /[\\/]node_modules[\\/]/,  //
          priority: -10
        },
        default: {
          minChunks: 2,  // 最小的共享chunk数
          priority: -20,
          reuseExistingChunk: true
        }
      }
    }
  }
};
# 四、编译优化类
# 4.1 DllPlugin && DllReferencePlugin && autodll-webpack-plugin
dllPlugin将模块预先编译,DllReferencePlugin将预先编译好的模块关联到当前编译中,当webpack解析到这些模块时,会直接使用预先编译好的模块。autodll-webpack-plugin相当于dllPlugin和DllReferencePlugin的简化版,其实本质也是使用dllPlugin && DllReferencePlugin,它会在第一次编译的时候将配置好的需要预先编译的模块编译在缓存中,第二次编译的时候,解析到这些模块就直接使用缓存,而不是去编译这些模块
dllPlugin 基本用法:
const output = {
  filename: '[name].js',
  library: '[name]_library',
  path: './vendor/'
}

module.exports = {
  entry: {
    vendor: ['react', 'react-dom']  // 我们需要事先编译的模块,用entry表示
  },
  output: output,
  plugins: [
    new webpack.DllPlugin({  // 使用dllPlugin
      path: path.join(output.path, `${output.filename}.json`),
      name: output.library // 全局变量名, 也就是 window 下 的 [output.library]
    })
  ]
}
DllReferencePlugin 基本用法:
const manifest = path.resolve(process.cwd(), 'vendor', 'vendor.js.json')

module.exports = {
  plugins: [
    new webpack.DllReferencePlugin({
      manifest: require(manifest), // 引进dllPlugin编译的json文件
      name: 'vendor_library' // 全局变量名,与dllPlugin声明的一致
    }
  ]
}
autodll-webpack-plugin 基本用法:
module.exports = {
  plugins: [
    new AutoDllPlugin({
      inject: true, // 与 html-webpack-plugin 结合使用,注入html中
      filename: '[name].js',
      entry: {
        vendor: [
          'react',
          'react-dom'
        ]
      }
    })
  ]
}
# 4.2 happypack && thread-loader
多线程编译,加快编译速度,
thread-loader不可以和mini-css-extract-plugin结合使用
happypack 基本用法
const HappyPack = require('happypack');
const os = require('os');
const happyThreadPool = HappyPack.ThreadPool({ size: os.cpus().length });
const happyLoaderId = 'happypack-for-react-babel-loader';

module.exports = {
  module: {
    rules: [{
      test: /\.jsx?$/,
      loader: 'happypack/loader',
      query: {
        id: happyLoaderId
      },
      include: [path.resolve(process.cwd(), 'src')]
    }]
  },
  plugins: [new HappyPack({
    id: happyLoaderId,
    threadPool: happyThreadPool,
    loaders: ['babel-loader']
  })]
}
thread-loader 基本用法
module.exports = {
  module: {
    rules: [
      {
        test: /\.js$/,
        include: path.resolve("src"),
        use: [
          "thread-loader",
          // your expensive loader (e.g babel-loader)
          "babel-loader"
        ]
      }
    ]
  }
}
# 4.3 hard-source-webpack-plugin && cache-loader
使用模块编译缓存,加快编译速度
hard-source-webpack-plugin 基本用法
module.exports = {
  plugins: [
    new HardSourceWebpackPlugin()
  ]
}
cache-loader 基本用法
module.exports = {
  module: {
    rules: [
      {
        test: /\.ext$/,
        use: [
          'cache-loader',
          ...loaders
        ],
        include: path.resolve('src')
      }
    ]
  }
}
# 五、编译分析类
# 5.1 webpack-bundle-analyzer
编译模块分析插件
new BundleAnalyzerPlugin({
  analyzerMode: 'server',
  analyzerHost: '127.0.0.1',
  analyzerPort: 8889,
  reportFilename: 'report.html',
  defaultSizes: 'parsed',
  generateStatsFile: false,
  statsFilename: 'stats.json',
  statsOptions: null,
  logLevel: 'info'
}),
# 5.2 stats-webpack-plugin && PrefetchPlugin
stats-webpack-plugin将构建的统计信息写入文件,该文件可在 http://webpack.github.io/analyse中上传进行编译分析,并根据分析结果,可使用PrefetchPlugin对部分模块进行预解析编译
stats-webpack-plugin 基本用法:
module.exports = {
  plugins: [
    new StatsPlugin('stats.json', {
      chunkModules: true,
      exclude: [/node_modules[\\\/]react/]
    })
  ]
};
PrefetchPlugin 基本用法:
module.exports = {
  plugins: [
    new webpack.PrefetchPlugin('/web/', 'app/modules/HeaderNav.jsx'),
    new webpack.PrefetchPlugin('/web/', 'app/pages/FrontPage.jsx')
];
}
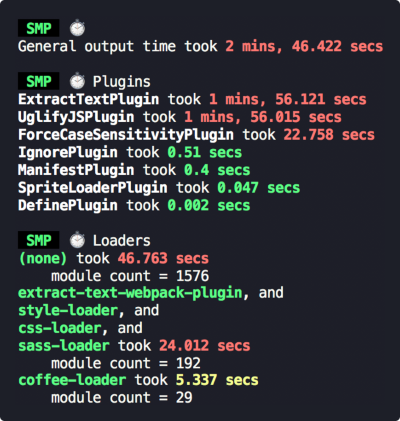
# 5.3 speed-measure-webpack-plugin
统计编译过程中,各
loader和plugin使用的时间
const SpeedMeasurePlugin = require("speed-measure-webpack-plugin");

const smp = new SpeedMeasurePlugin();

const webpackConfig = {
  plugins: [
    new MyPlugin(),
    new MyOtherPlugin()
  ]
}
module.exports = smp.wrap(webpackConfig);